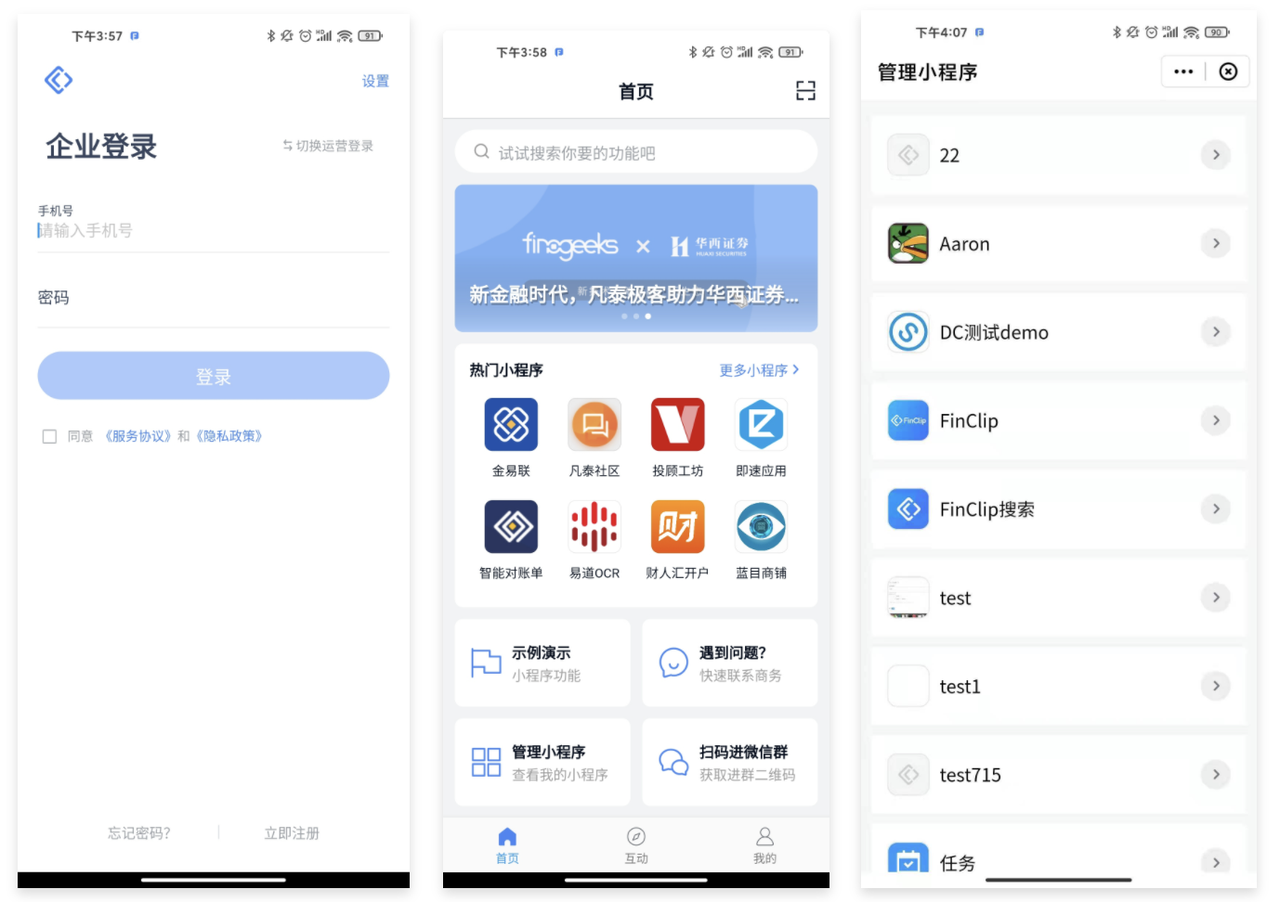
Appearance
FinClip Developer Portal Guide
This operation guide is only applicable to the Community Edition and the Private Edition, and is continuously being updated.
1.Registration and Login
Log into the Developer Portal you have already deployed and click 「Sign up for free」 on the page.

You need to complete the account registration through the following steps:
Step 1: Fill in Account Information
Enter your account, phone number, sms verification code, email, and set a login password, then click 「Register」 to successfully register.
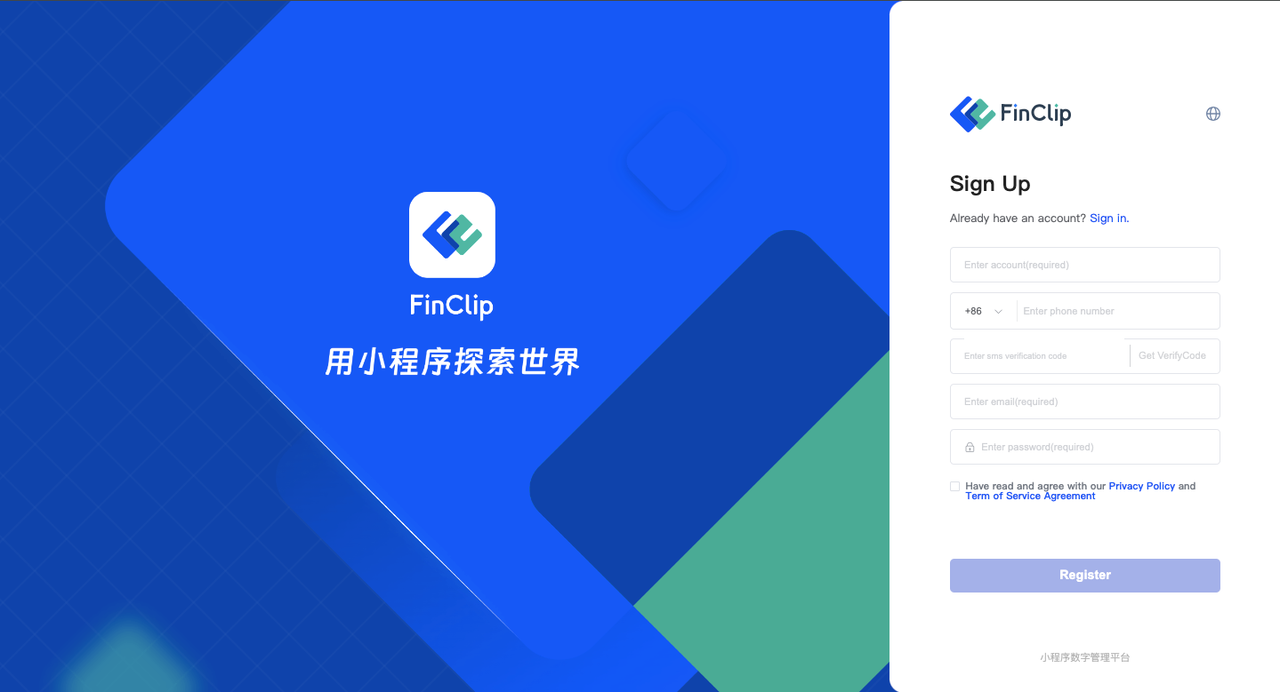
Step 2: Supplement Enterprise Information
After completing the registration, go to the Developer Portal. And sequentially click on 「Username - Change to Corporate Team」 at the bottom left corner, to go to the enterprise certification page.
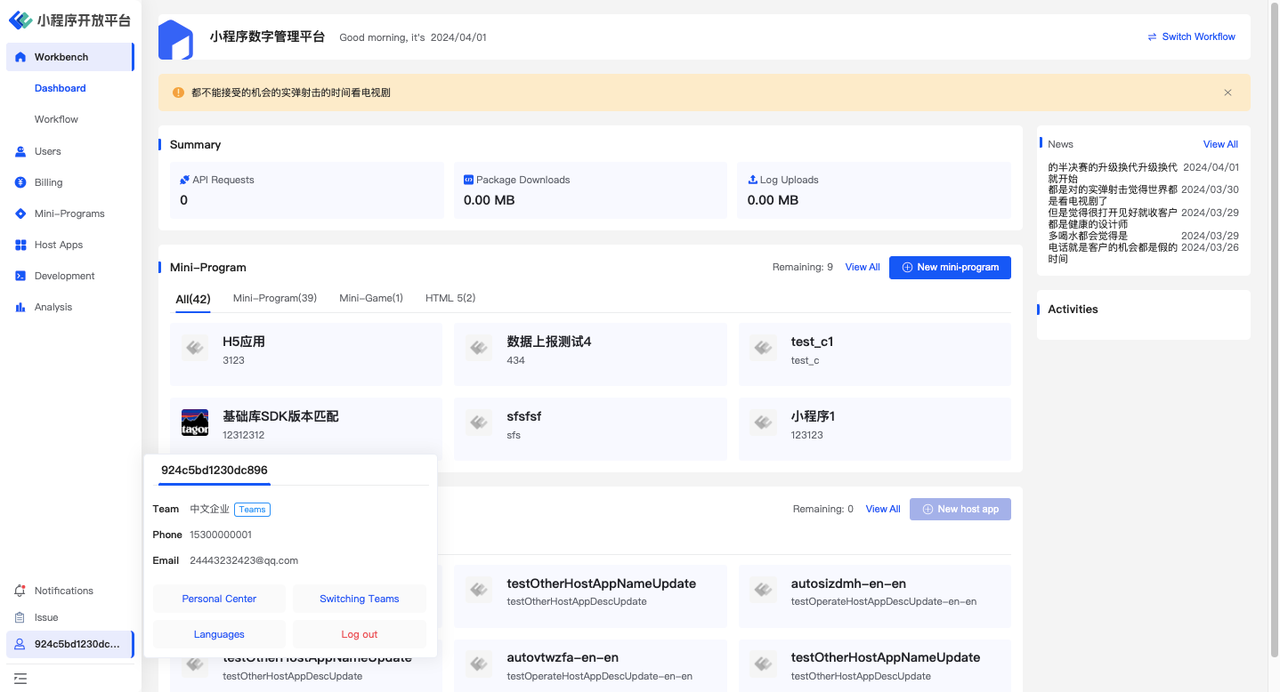
On the enterprise certification page, you need to fill in the enterprise entity information and the administrator information.
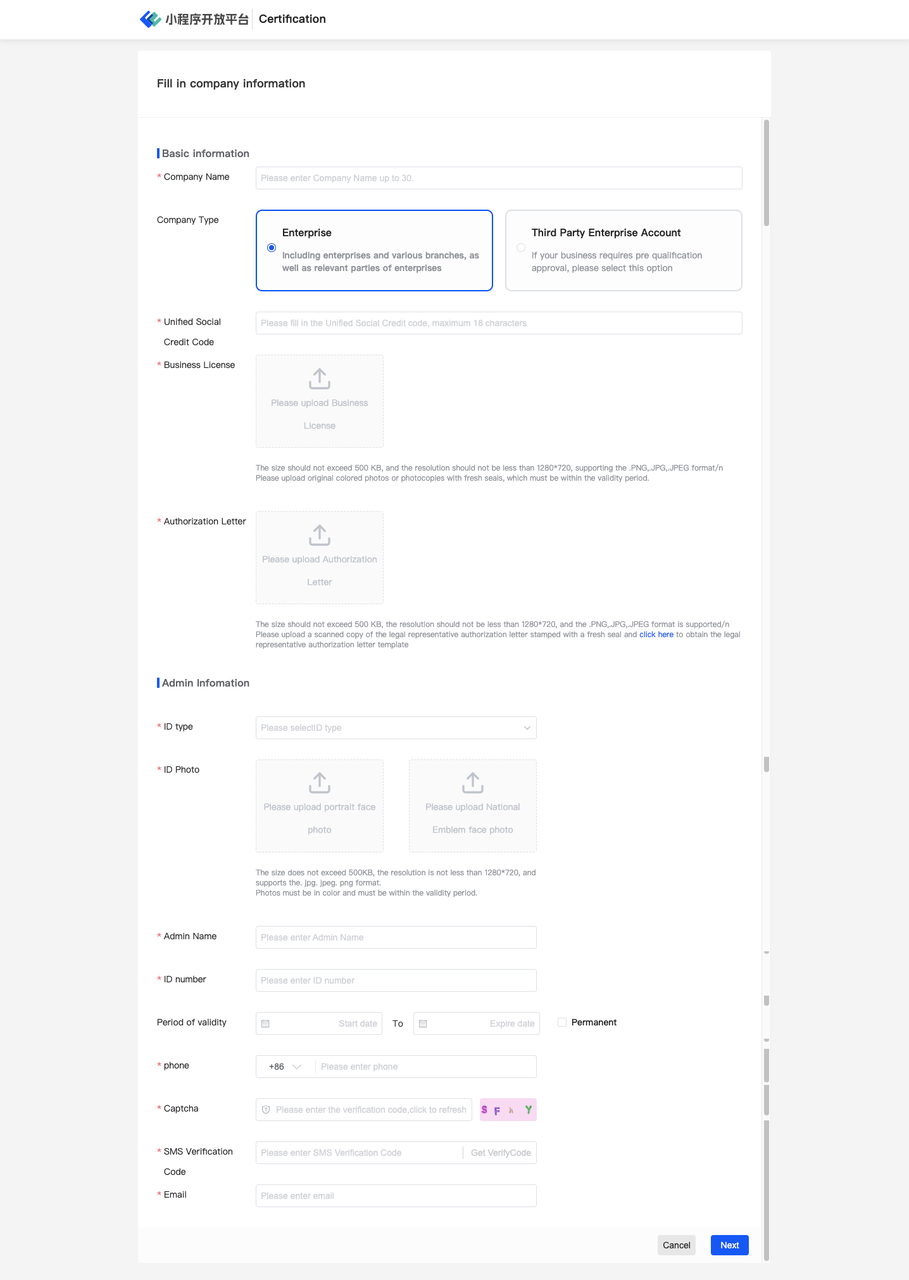
Step 3: Upgrade the Current Team to Enterprise Type
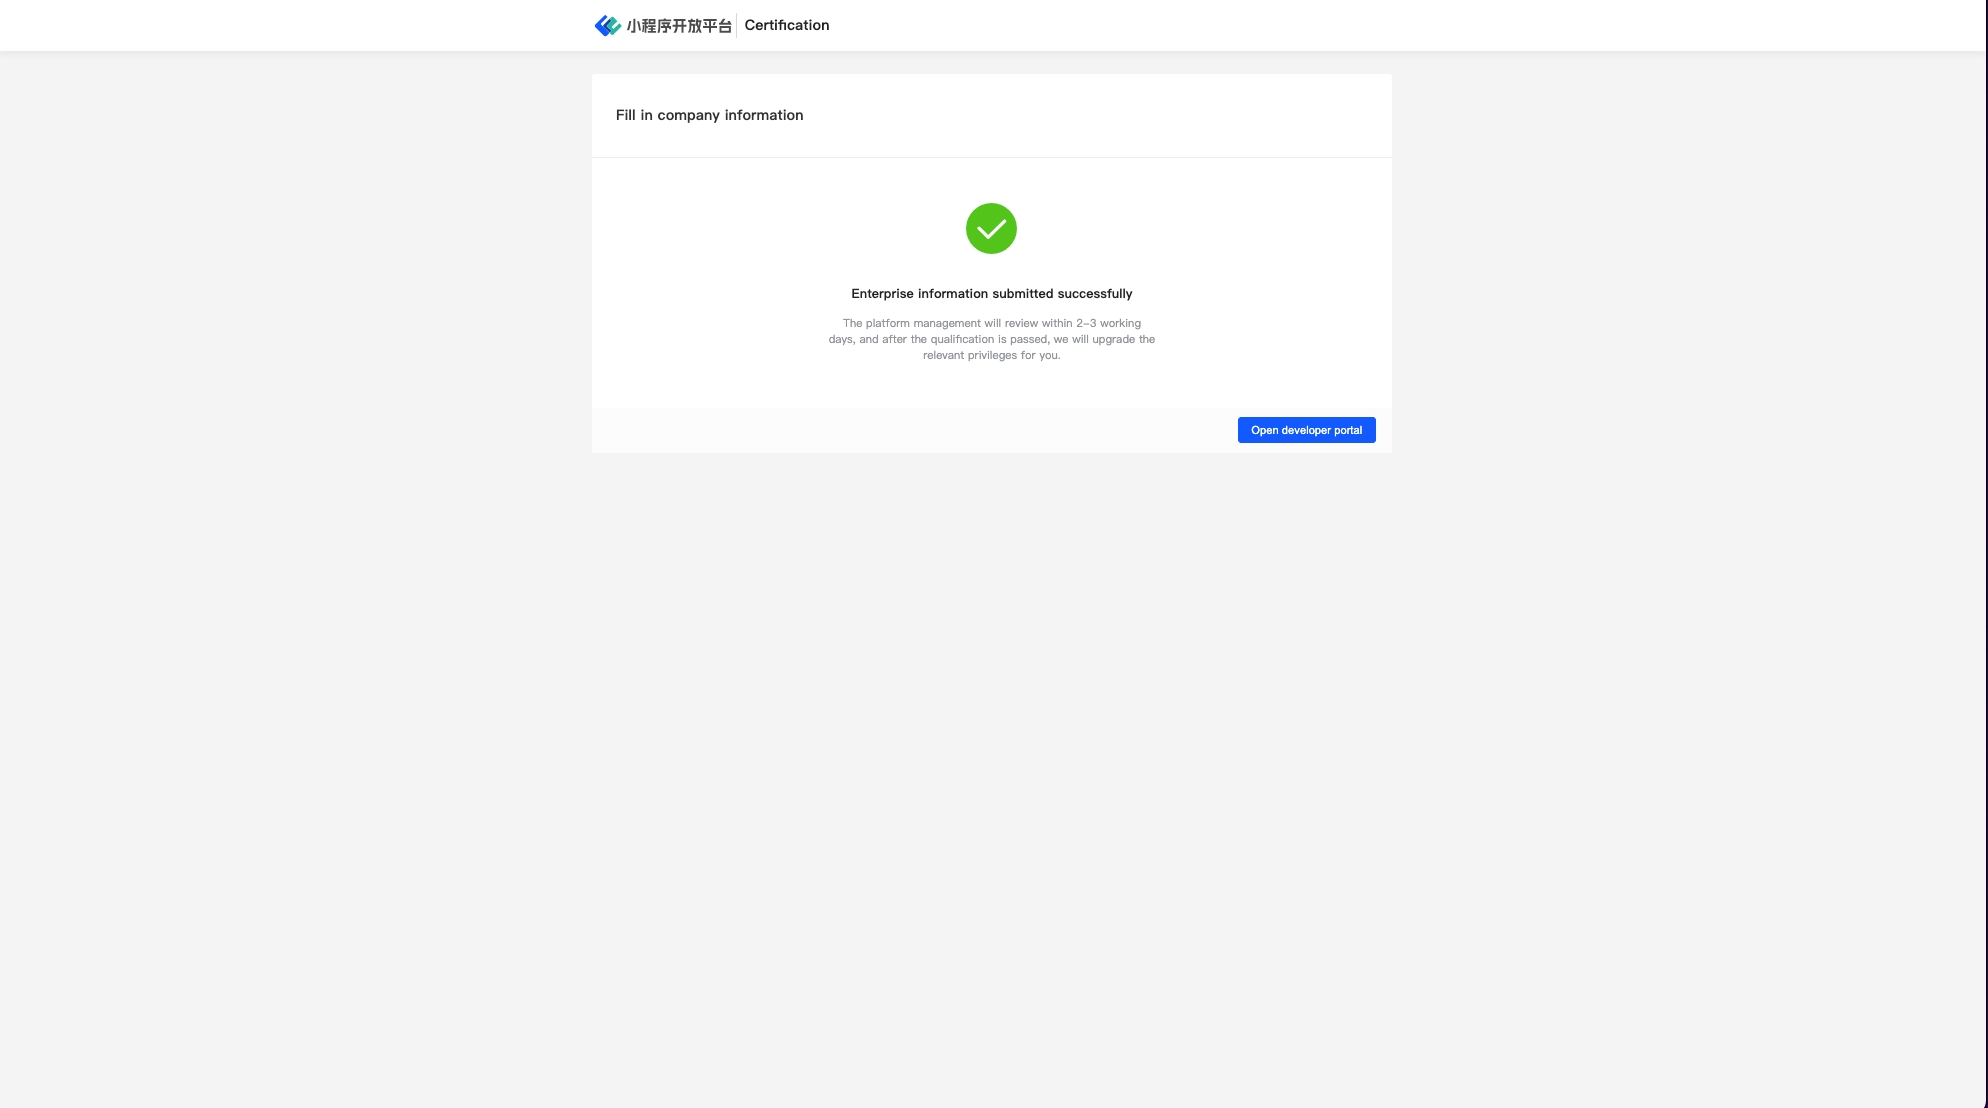
After submitting without errors, a submission success page will appear. You just need to wait for the Administration Portal to review the enterprise information.
2.Role and Member Management
The Developer Portal supports custom roles and allows for flexible customization of permissions based on roles, achieving the goal of managing member account permissions. The specific operations are as follows:
Step 1: Add a New Role
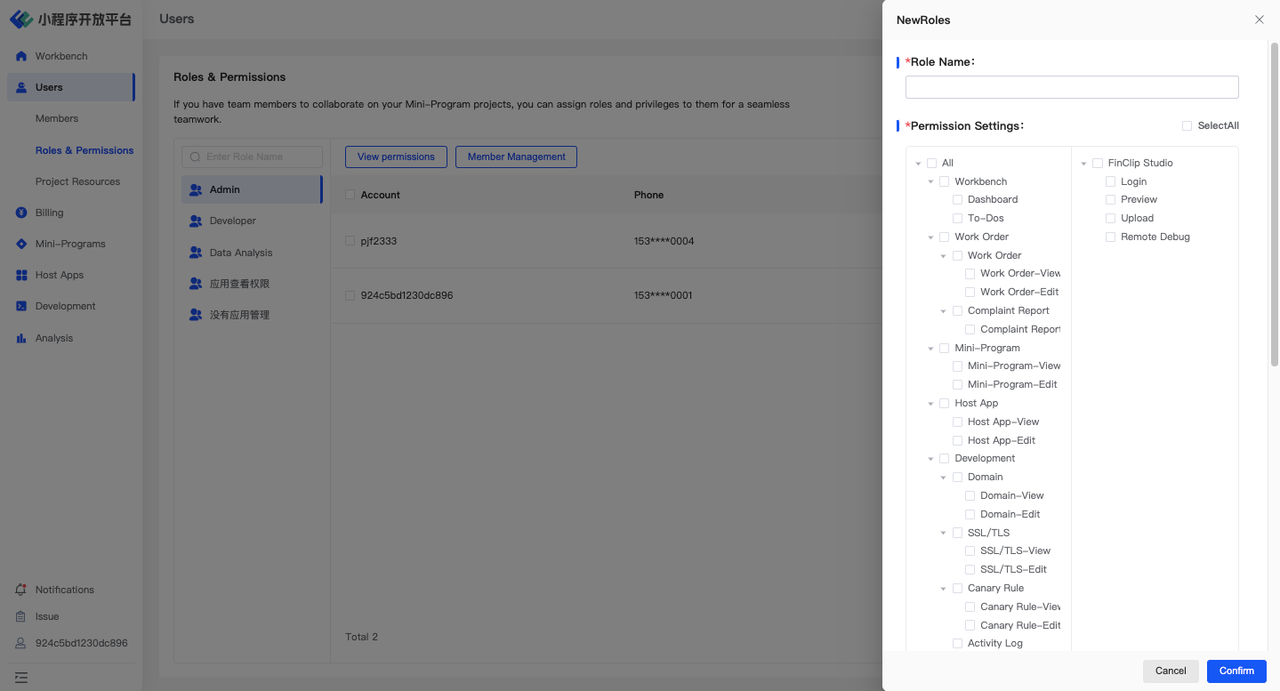
Click the "New" button on the "Users - Role & Permissions" page.

Step 2: Assign Permissions to the New Role
In the 「NewRoles」 drawer, enter the name of the role and check the corresponding admin and developer tool permissions, then click 「Confirm」 to save.
Step 3: Assign Roles to Members
Members of the Developer Portal are divided into Collaborators and Beta Testers:
- Collaborators: Refer to personnel who can use the developer tools, log into the Developer Portal, and view and manage mini-programs.
- Beta Testers: Refer to individuals who can preview the development version and experience version of the mini-programs of the organization through scanning a QR code with an APP. No additional role configuration is needed.
Assign Roles to Collaborators
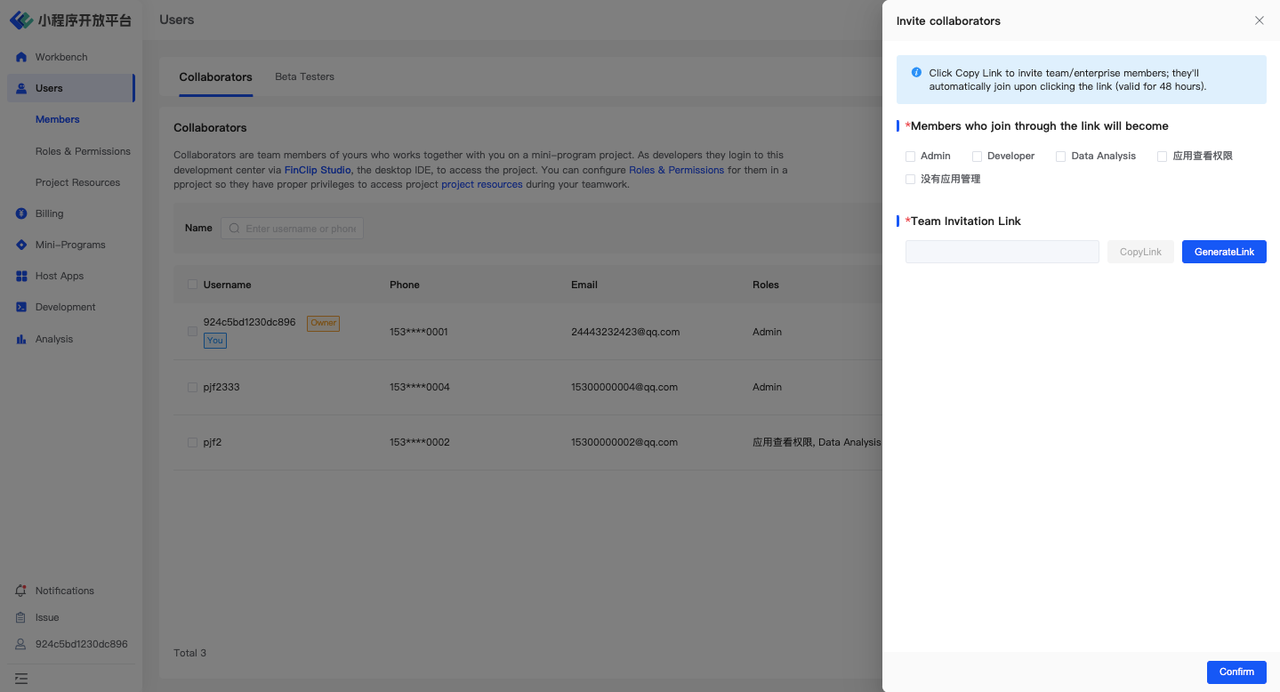
Collaborators is "by invitation only", and users can join the organization through an invitation link. When inviting, a role must be selected, and after the user successfully joins, the manager can edit their role again. If the user does not have an account on the mini-program platform, they must register before joining the new organization.
Method 1:Select a role when inviting
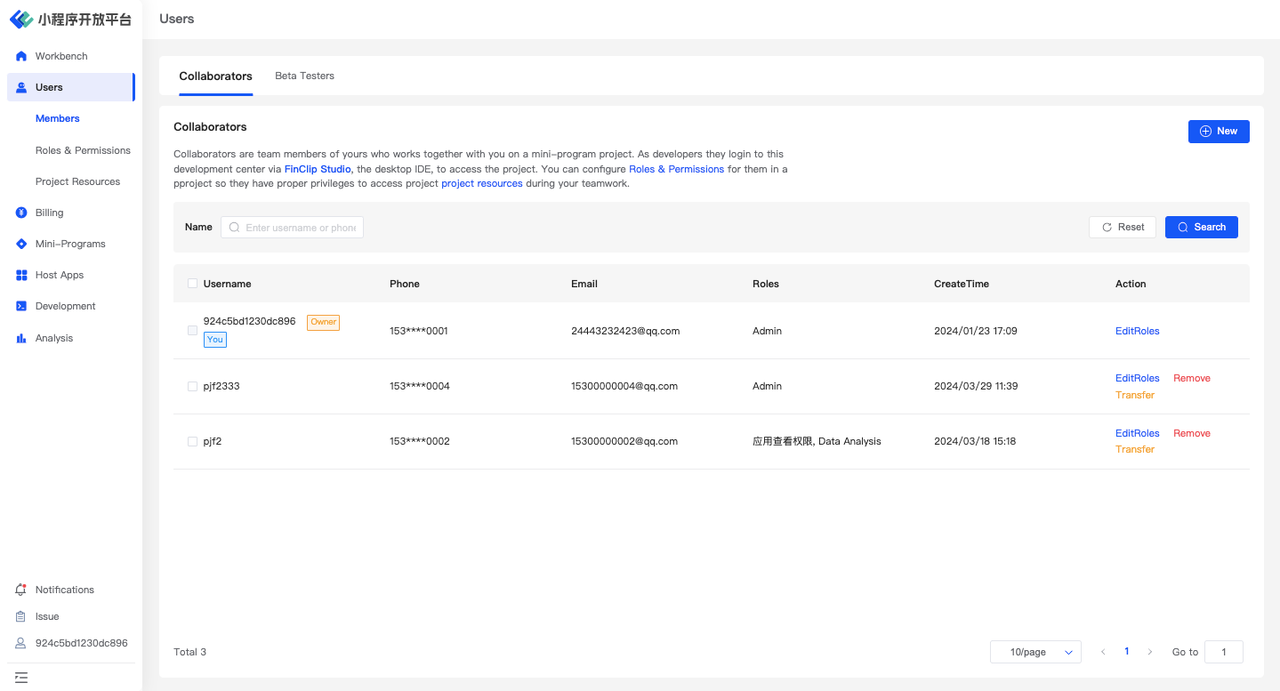
Click 「Users-Members-Collaborators-New」, check a role in the popup window, generate a link, and copy the link. Users can join the enterprise through the invitation link.
Method 2: After the user joins the enterprise, the administrator assigns them a specific role
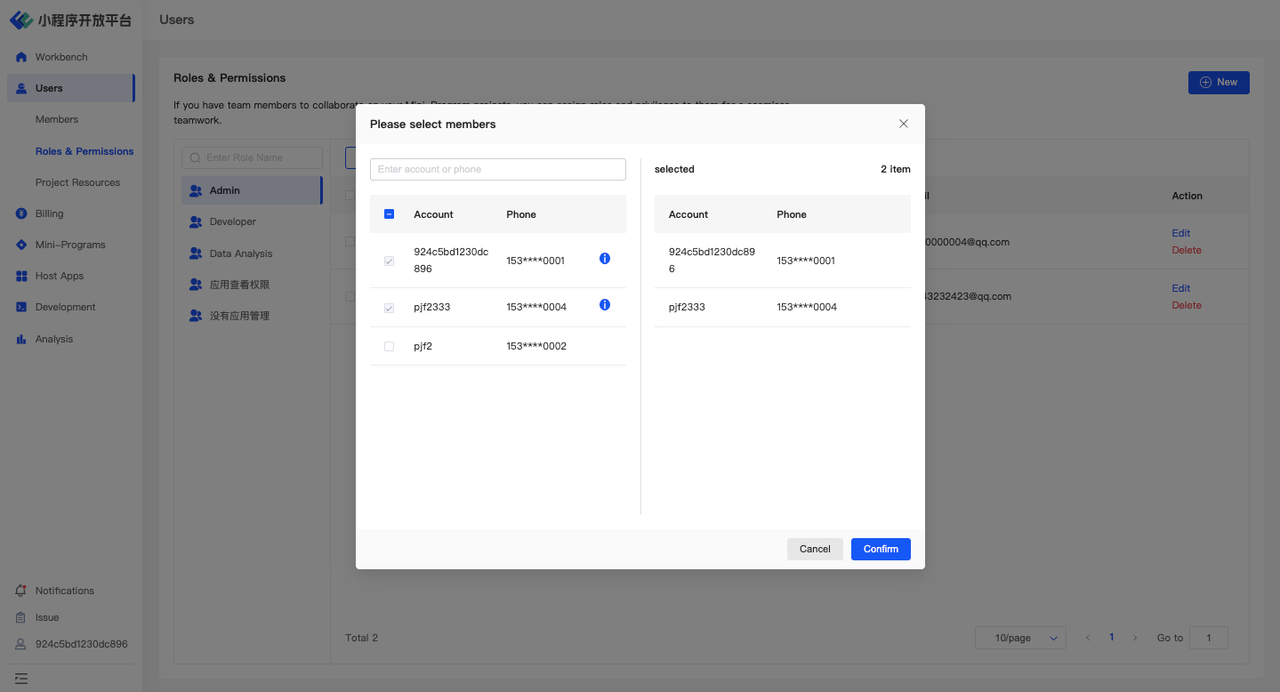
- Path one: Users-Roles & Permissions--Member Management
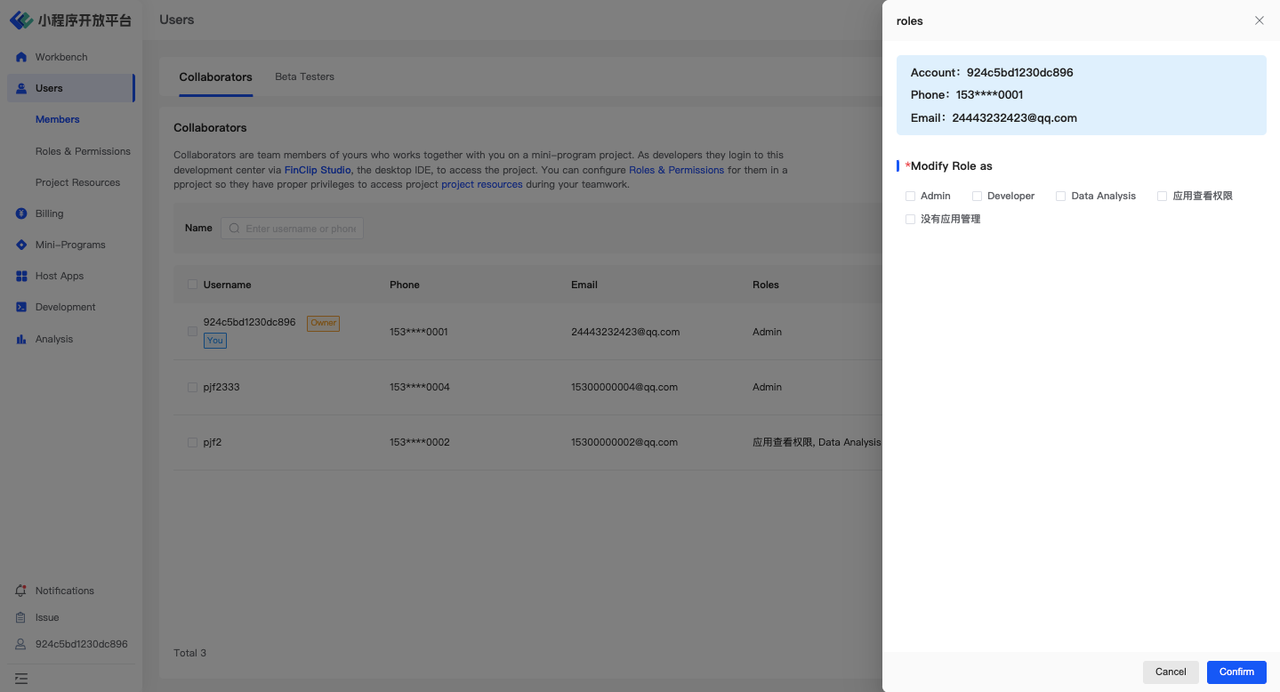
- Path two:Users-Members-Collaborators-Action-EditRoles
Add Beta Testers
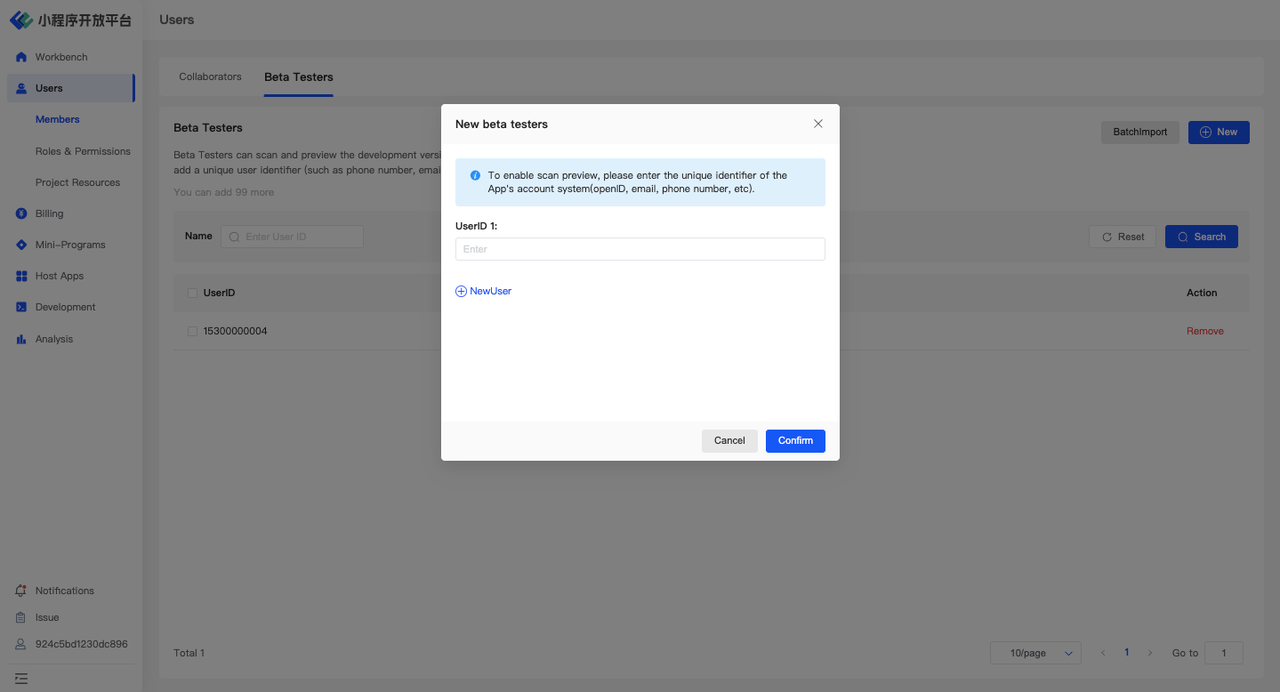
Unlike Collaborators, Beta Testers are added through an "addition system" by adding external individuals as Beta Testers via their user ID.
Here, the user ID should be a unique identifier independent of the mini-program platform, derived from an external APP's account system. It serves as a credential for the APP system to verify backend permissions for the user. It is recommended that APPs inject the mobile phone number as the user ID when integrating the SDK, making it more convenient to import the user ID later.
Path:Users-Members-Beta Testers-New
3.Create a Mini-Program
3.1 Create a New Mini-Program
You can create a new mini-program through the following 2 entry points:
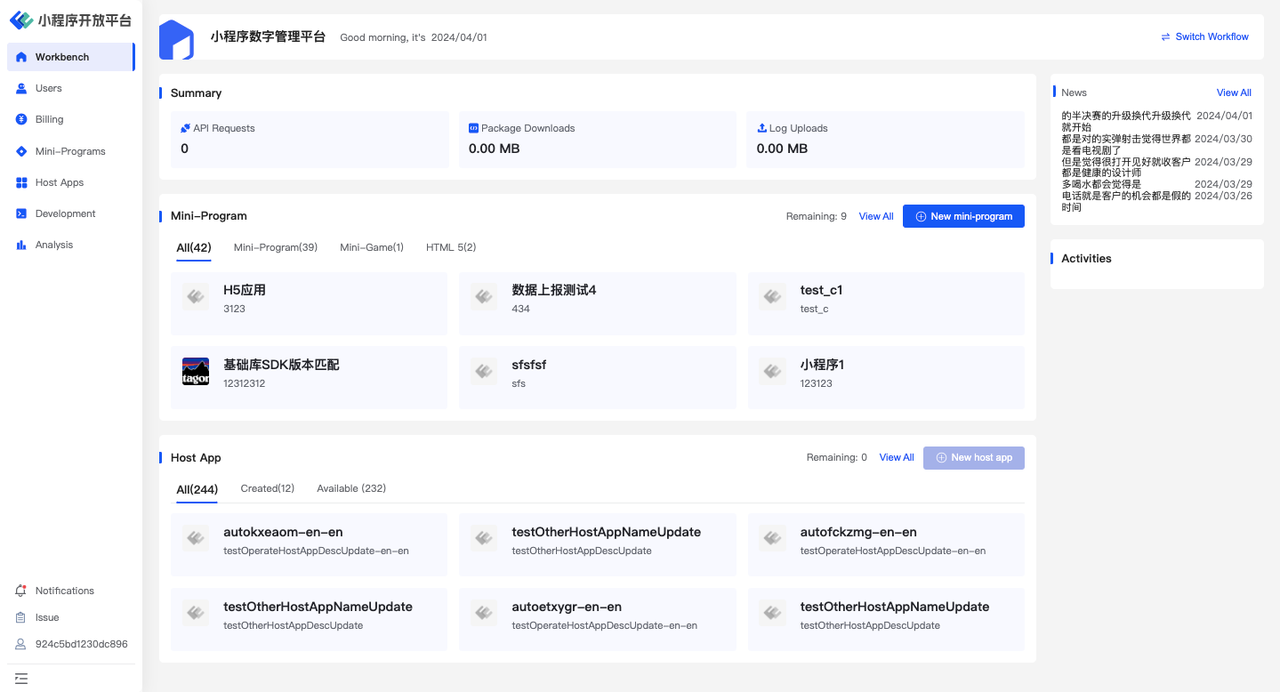
Entry 1: After logging into the Developer Portal, click「New mini-program」 in Workbench-Dashboard-Mini-Program
Entry 2: In「Mini-Program」, click 「New」.
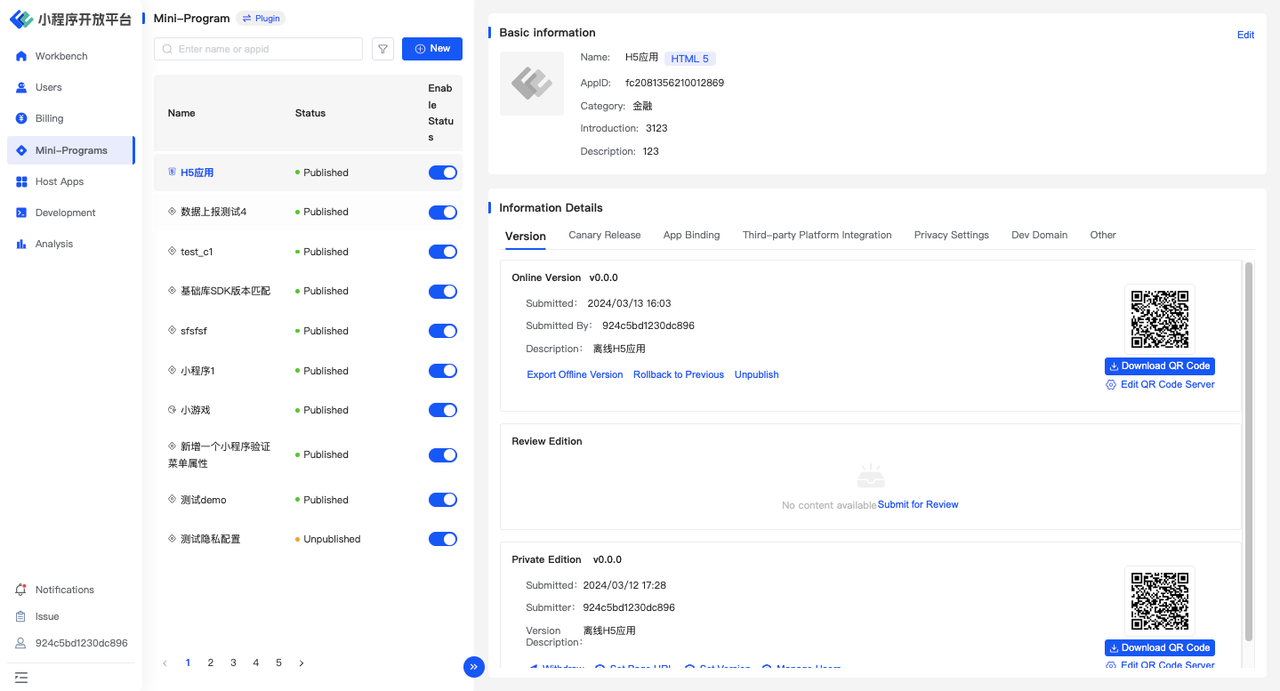
When creating a mini-program, you need to fill in basic information such as the mini-program's name, type, category, and a brief introduction, as shown in the following image:
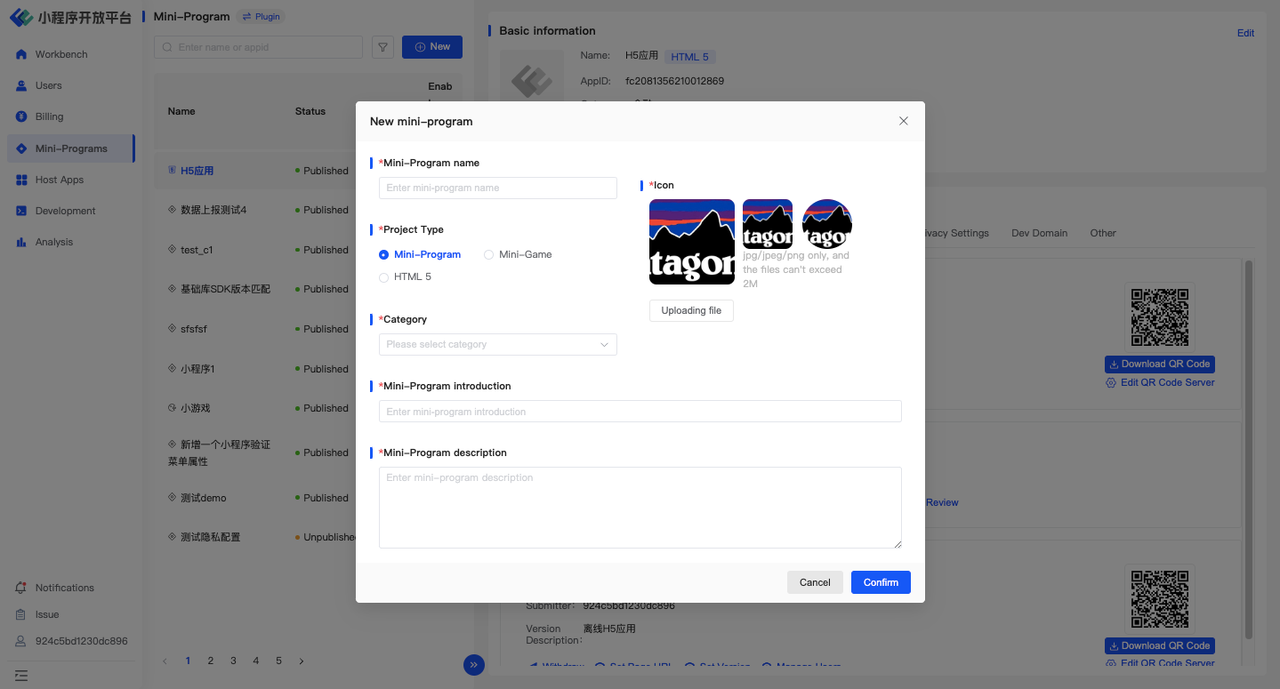
3.2 Modify Basic Information of the Mini-Program
After the mini-program is successfully created, click on the mini-program, and the details of the mini-program will be displayed on the right. Click「Edit」 in 「Basic Information」to modify the mini-program information.
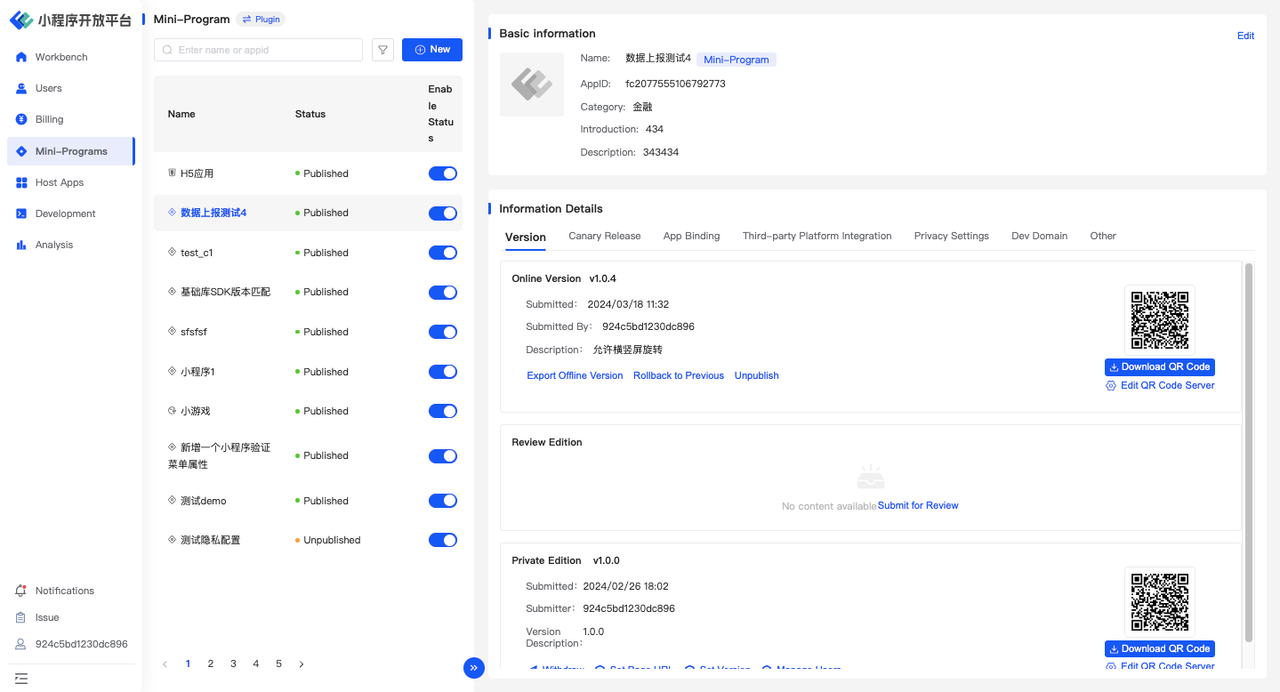
Basic information includes the mini-program's name, type, category, brief introduction, and detailed description. Clicking on 「Language Setting」 in the bottom left corner will take you to the multi-language configuration page.
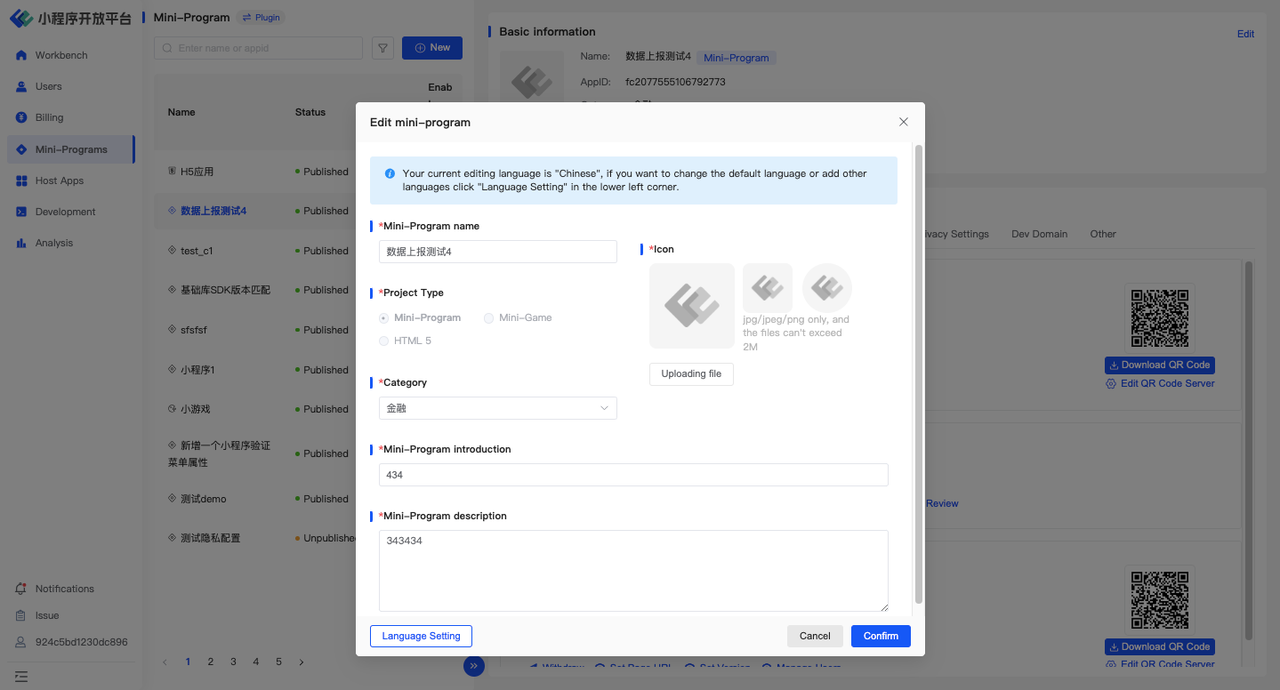
In the mini-program details, you can manage versions, set privacy, conduct phased rollouts, and more.

3.3 View Created Mini-Programs
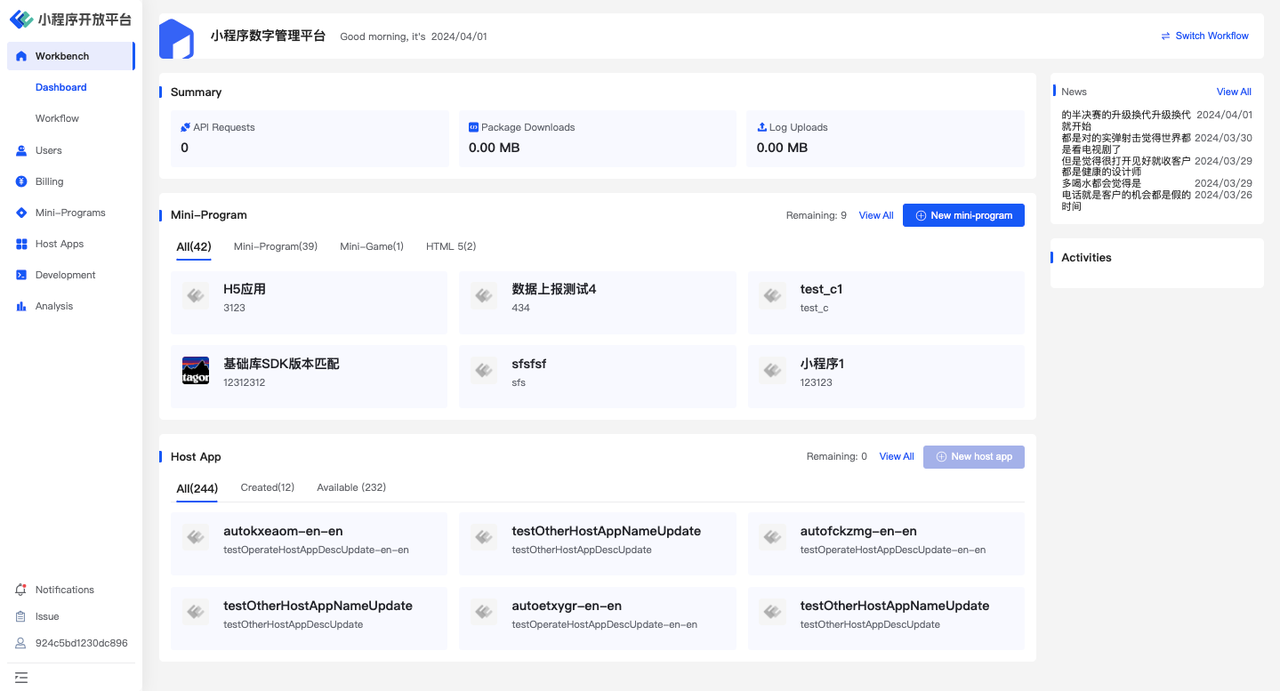
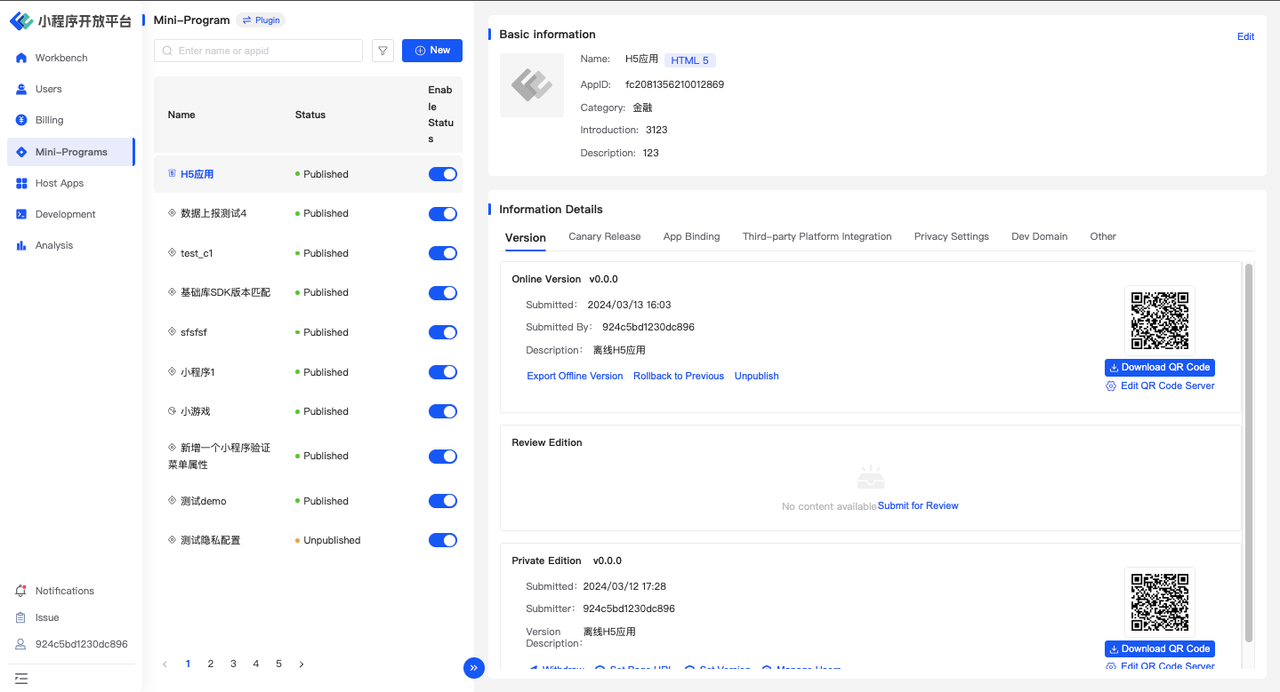
To view the mini-programs you have created, you can enter through the 「Workbench」 or 「Mini-Program」menu.
- Path one:Workbench-Dashboard-Mini-Program
- Path two:Mini-Programs-Mini-Program
4.Develop Mini-Programs
4.1 Development Tools
This platform's mini-programs are compatible with WeChat, ByteDance, Alipay, etc. During the development process, it is recommended to use FinClip Studio or WeChat Developer Tools, or VSCode (any development tool you are accustomed to) for development, and to use FinClip Studio or WeChat Developer Tools for previewing and debugging;
Before development, it is advised to read the Mini-Program Development Guide. Given the high compatibility of this platform with WeChat Mini-Programs, you can also refer to the WeChat Mini-Program Development Documentation for development;
If you need to use a third-party framework, it is recommended to use the following third-party frameworks with good compatibility:
4.2 Complete Domain Configuration
To ensure sufficient security in mini-program applications, all network request domains within the mini-program need to be configured in advance, and can only be accessed normally after configuration.
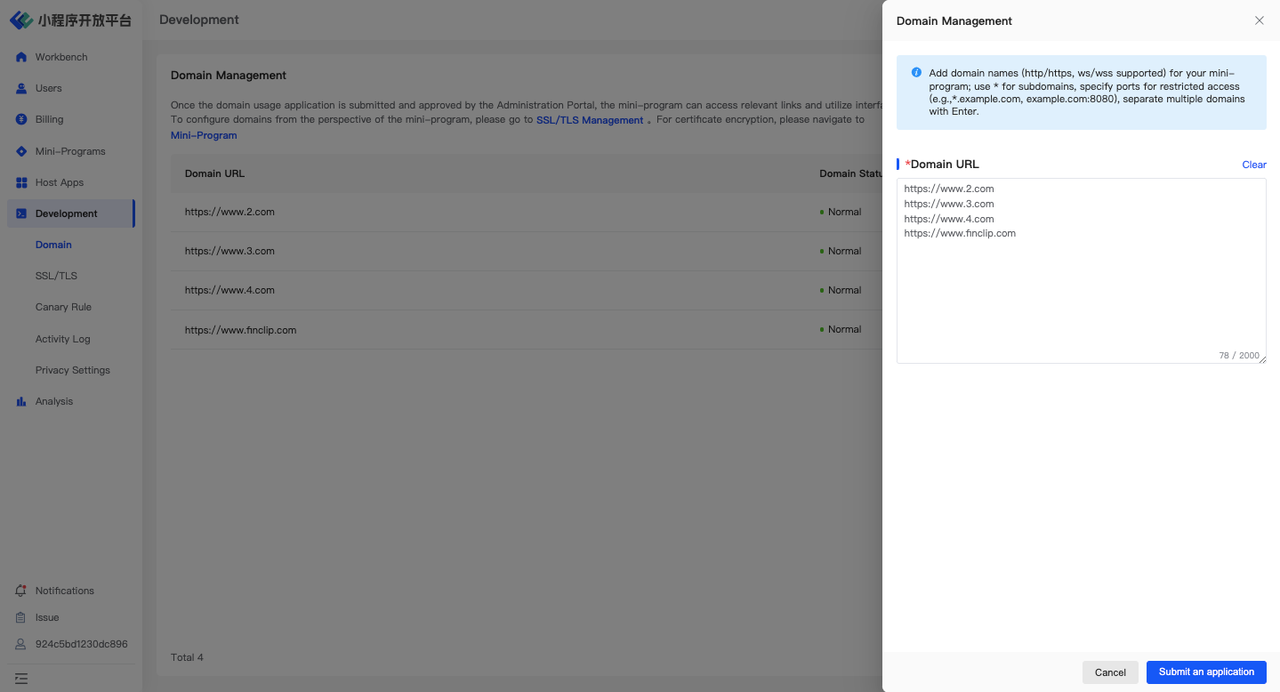
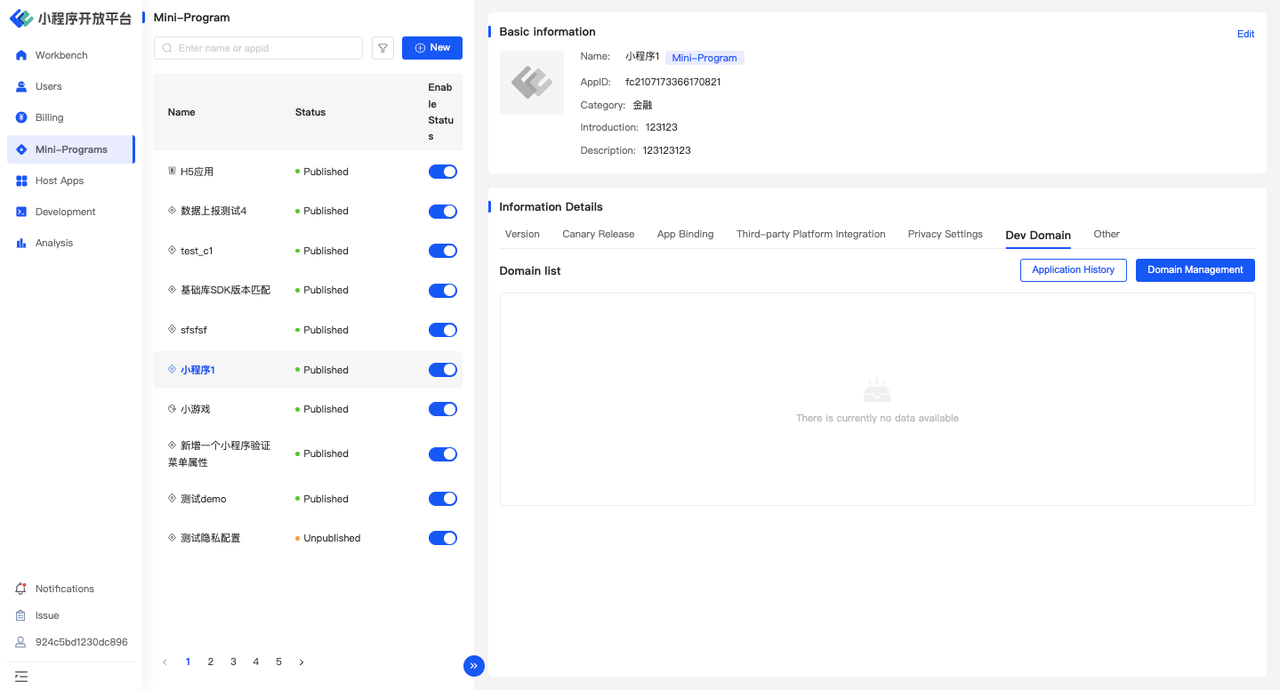
On the 「Development - Domain」 page, you can manage all the mini-program domains that the current team can use (i.e., once configured, it applies to all mini-programs at the same time). Enter all the domains used by the current team in the domain configuration section and use "Enter" to differentiate before saving.
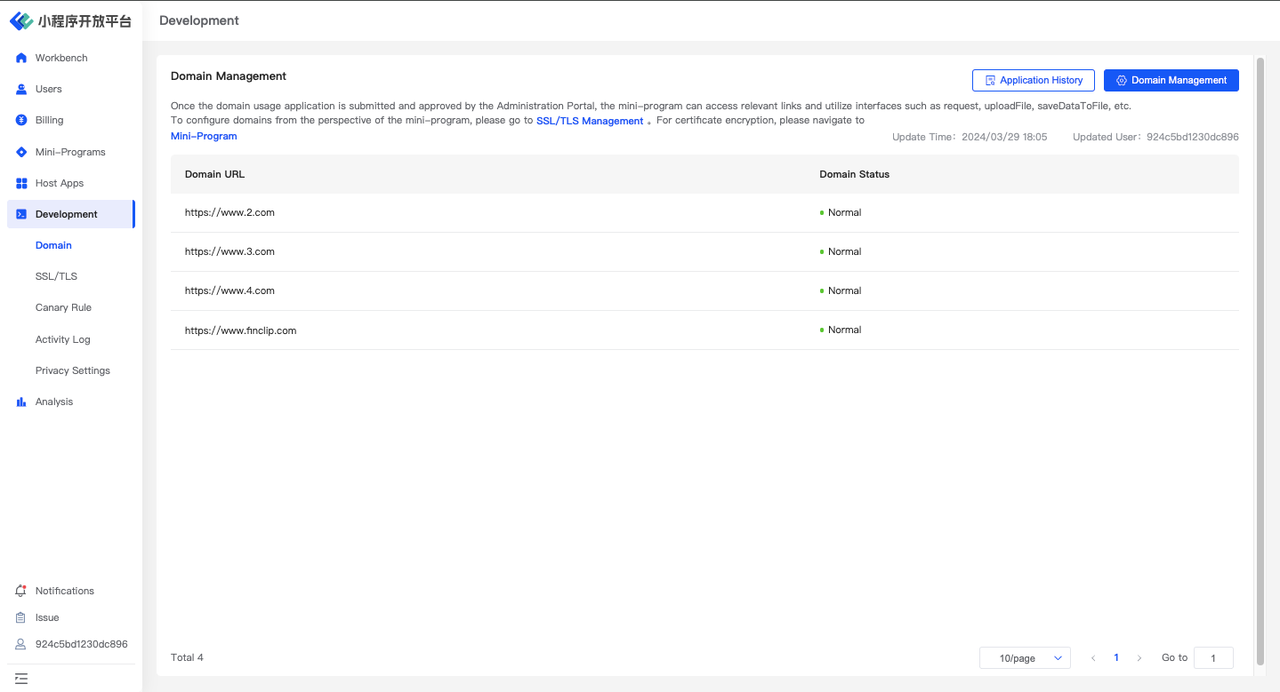
When entering domains, you need to fill them out as required, such as entering the full address with a protocol header, like https://example.com/page1.html
If the domains you need to configure only need to be effective in a specific mini-program, you can configure them on the mini-program details page. The domains configured in the mini-program details page will only be effective for the current mini-program.
4.3 Preview and Debugging
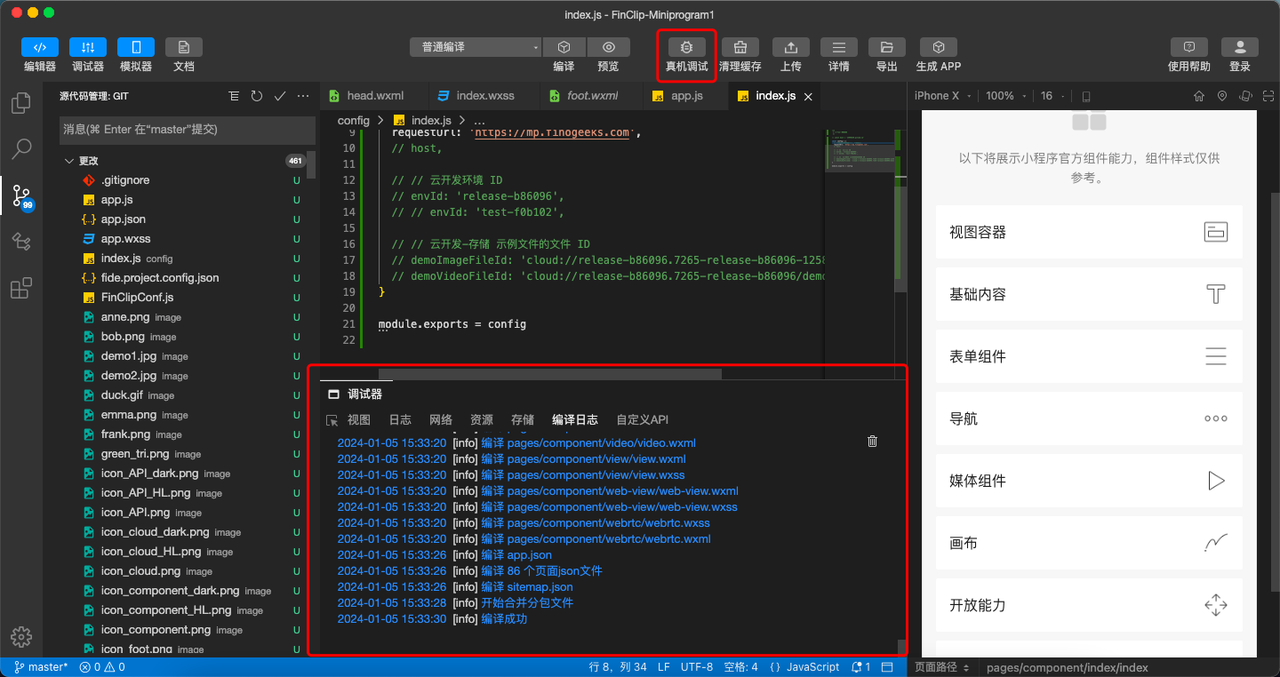
You can use FinClip Studio for real-time preview and debugging, or set the mini-program as an experience version for debugging.
Method 1: Debug through FinClip Studio
Method 2: Debug through the Experience Version
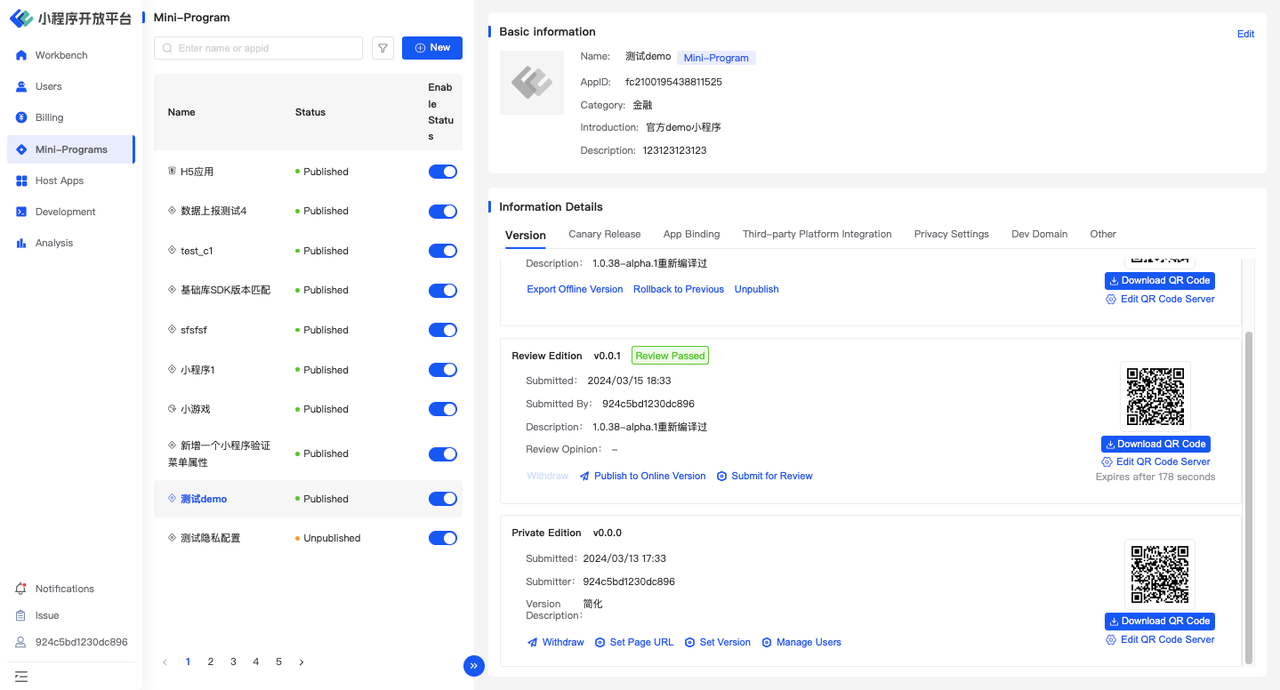
After the code package has been successfully uploaded, you can click on 「Set Version」 in the 「Mini-Programs-Mini-Program-Basic-Information-Version-Set Version」 page to set the corresponding version of the mini-program as the experience version.
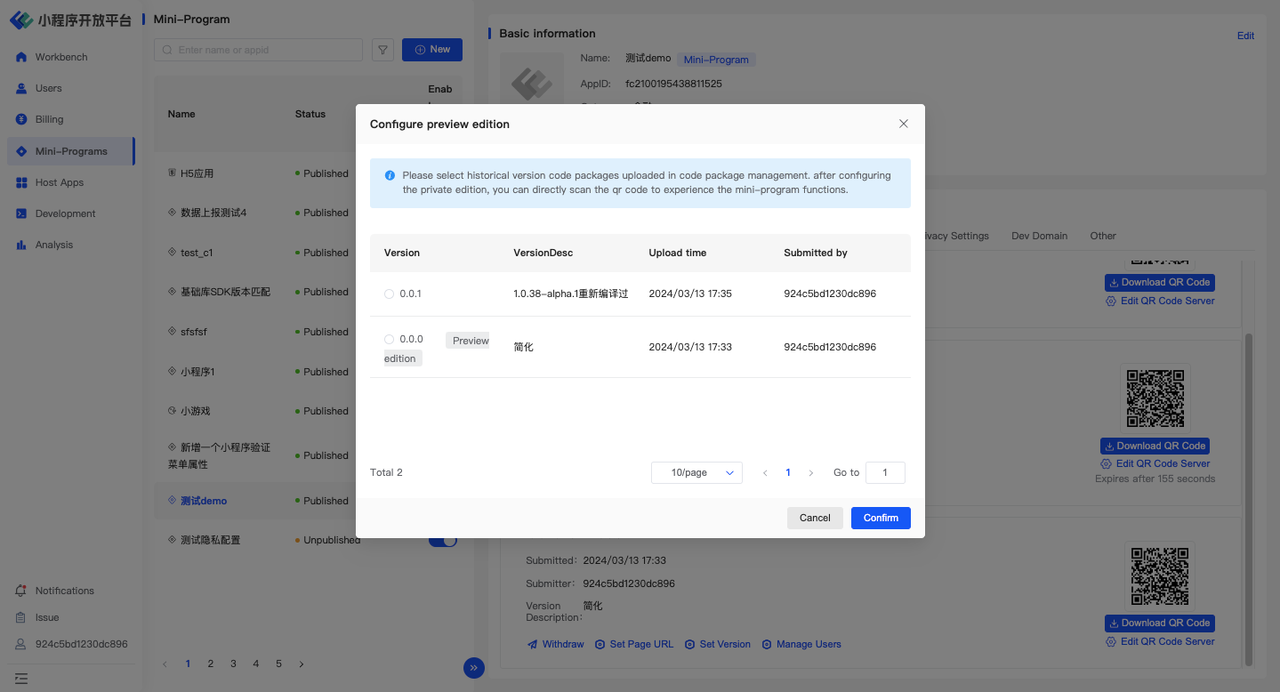
After configuration, use the FinClip APP to scan the QR code (for how to use the FinClip APP, please refer to: FinClip APP FAQ) to proceed with the preview and testing.
4.4 Upload Code Packages Using Studio
Please download FinClip Studio to complete the code package upload. FinClip Studio can compile mini-program code locally and directly upload the code package. For detailed operation instructions, please refer to: Developer Tools Operation Guide.
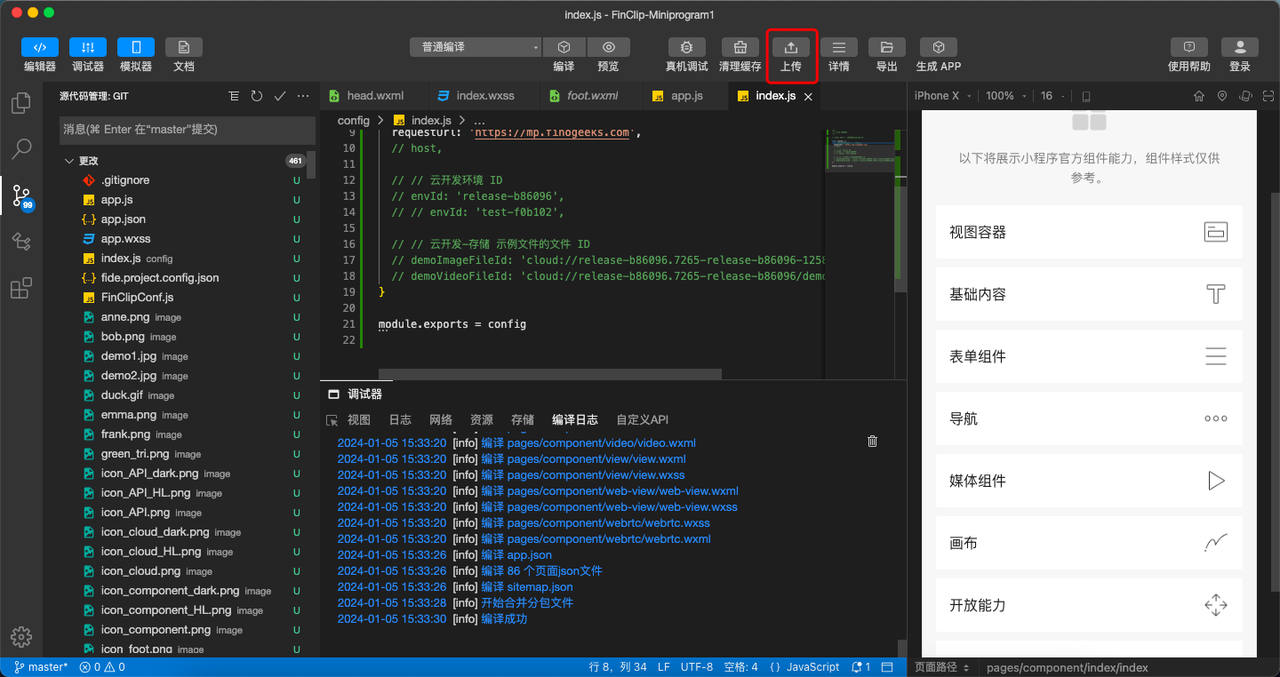
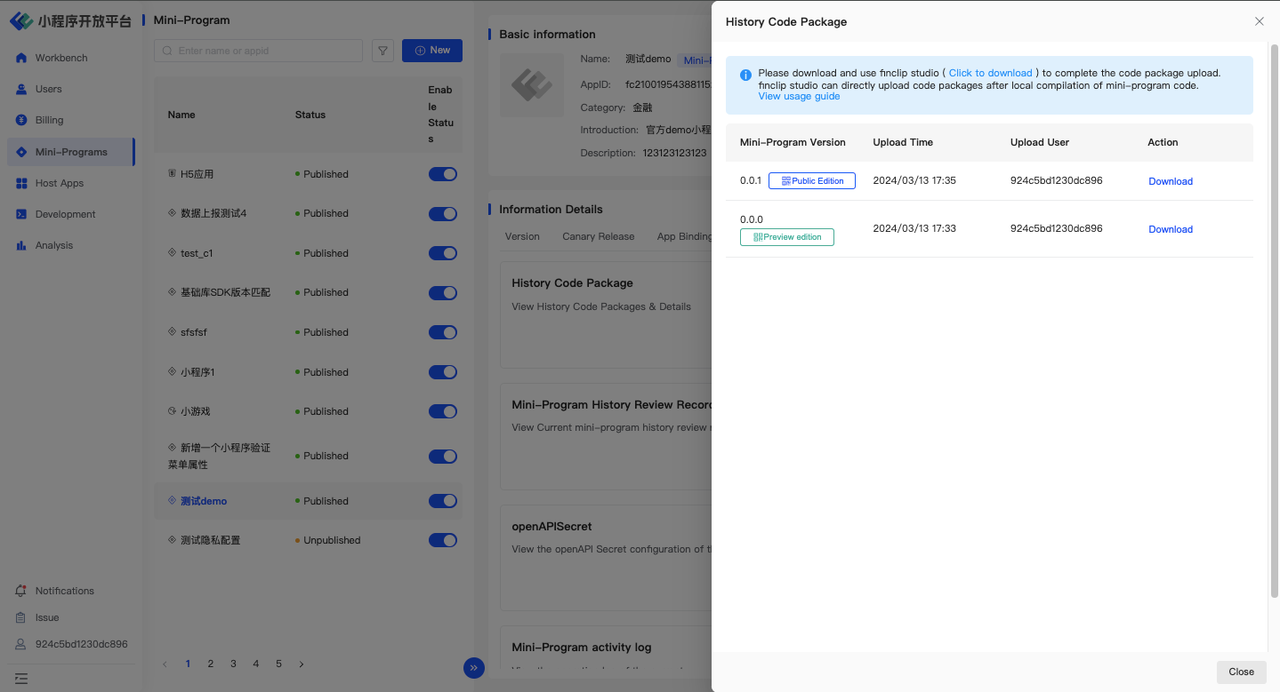
After a successful upload, you can view it in 「Mini-Program-Basic Information-Other-History Code Package-View」.
5.Mini-Program Submission for Review and Publishing
5.1 Complete Privacy Settings
After the mini-program is created, you need to complete the "Privacy Settings" before you can submit the code package and proceed with the mini-program's launch review process.
Privacy settings will be disclosed to users in scenarios such as the additional information page and authorization pop-ups when using the mini-program.
Path:Mini-Programs-Privacy Settings
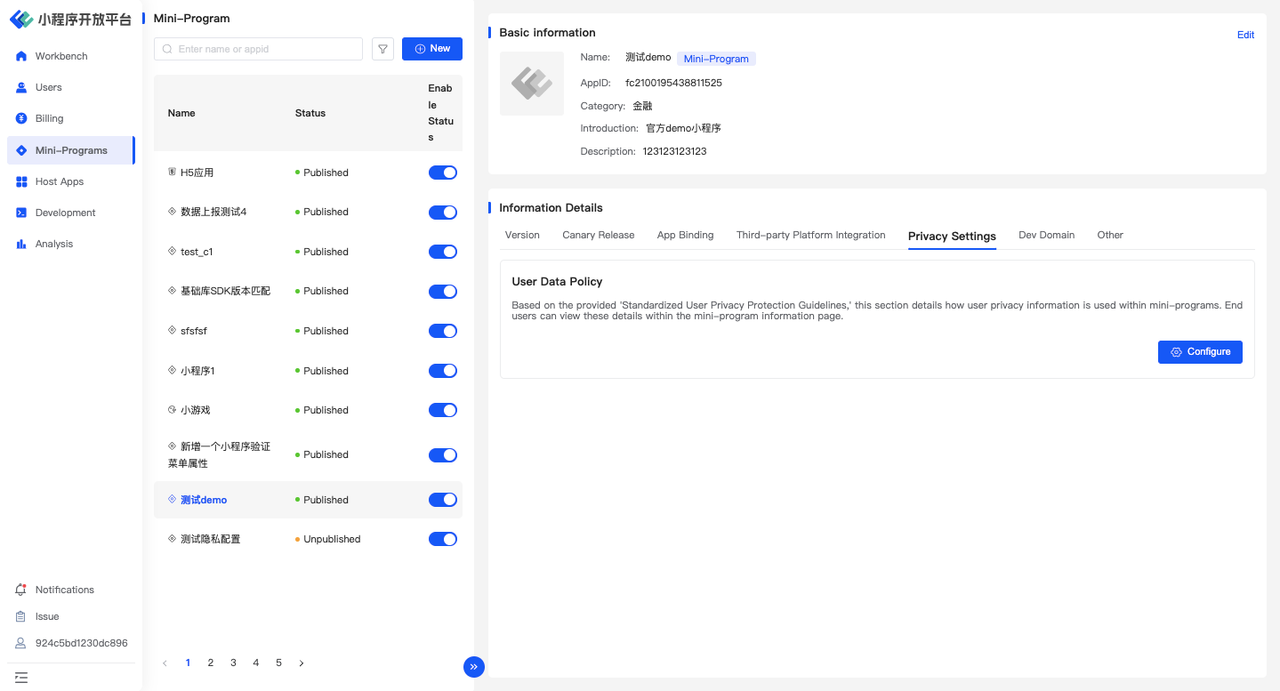
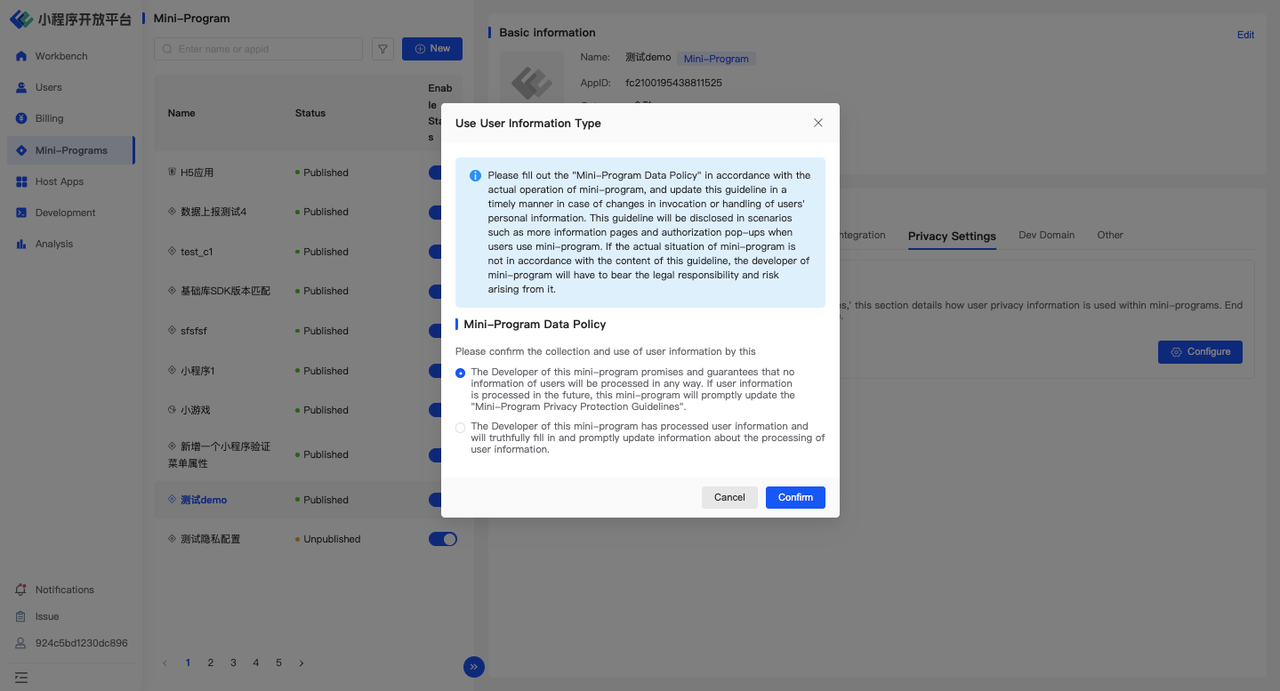
Click「Configure」, and you must follow the page guide to supplement the corresponding mini-program privacy information interface.
- If you have not used any user-generated content (UGC) in your mini-program, select the first option "The developer of this mini-program promises and guarantees that no information of users will be processed in any way. If user information is processed in the future, this mini-program will promptly update the 'Mini-Program Privacy Protection Guidelines' ."
- Otherwise, please follow the guide, select the second option, and enter the corresponding permissions.
5.2 Submit for Review
After configuring the domain, uploading the code package, and completing the privacy settings, you can add a new review and submit it in「Mini-Program-Basic Information-Version」. Fill in the additional information for the review and wait for the Digital Center to approve or reject it. The review results will be notified to you through the 「Notifications」.
Path:Mini-Programs-Basic Information-Version-Submit for Review
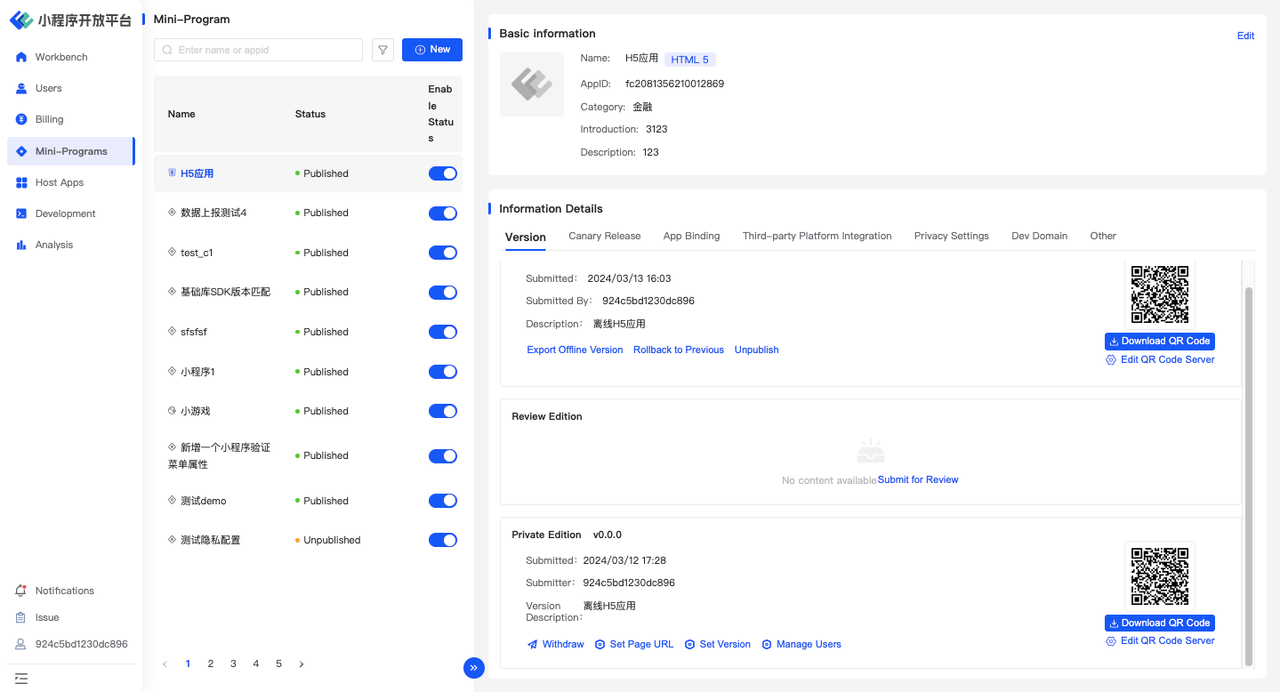
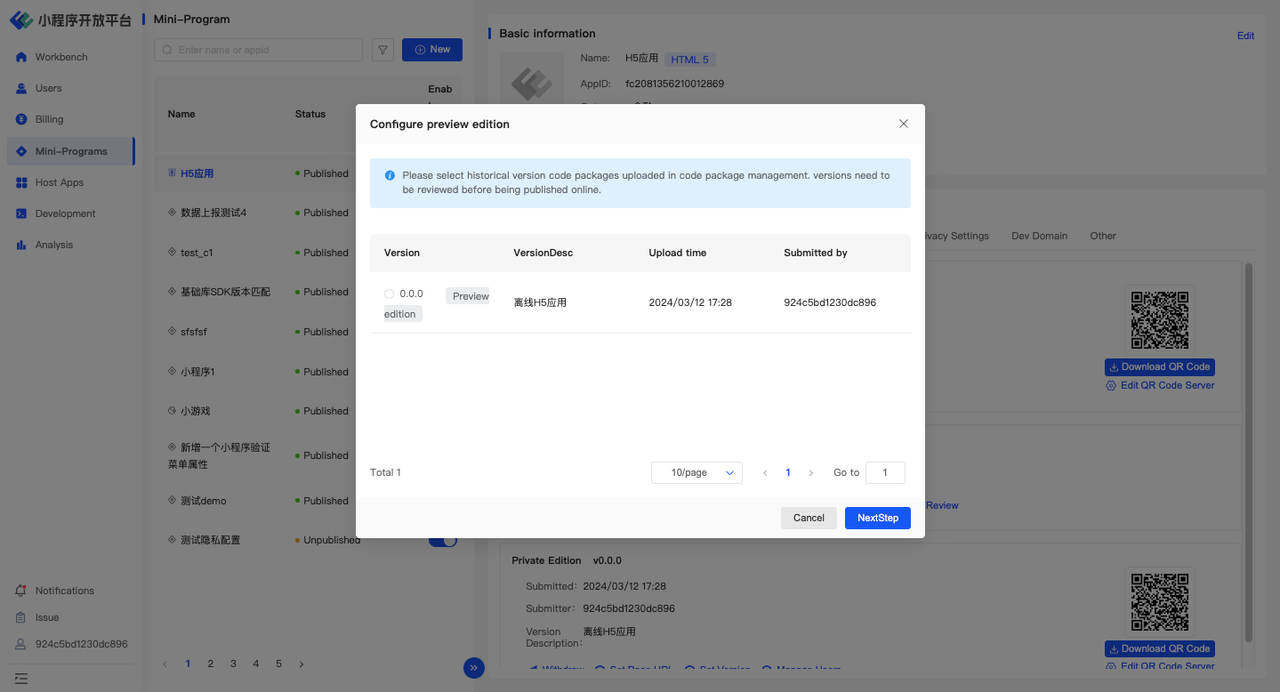
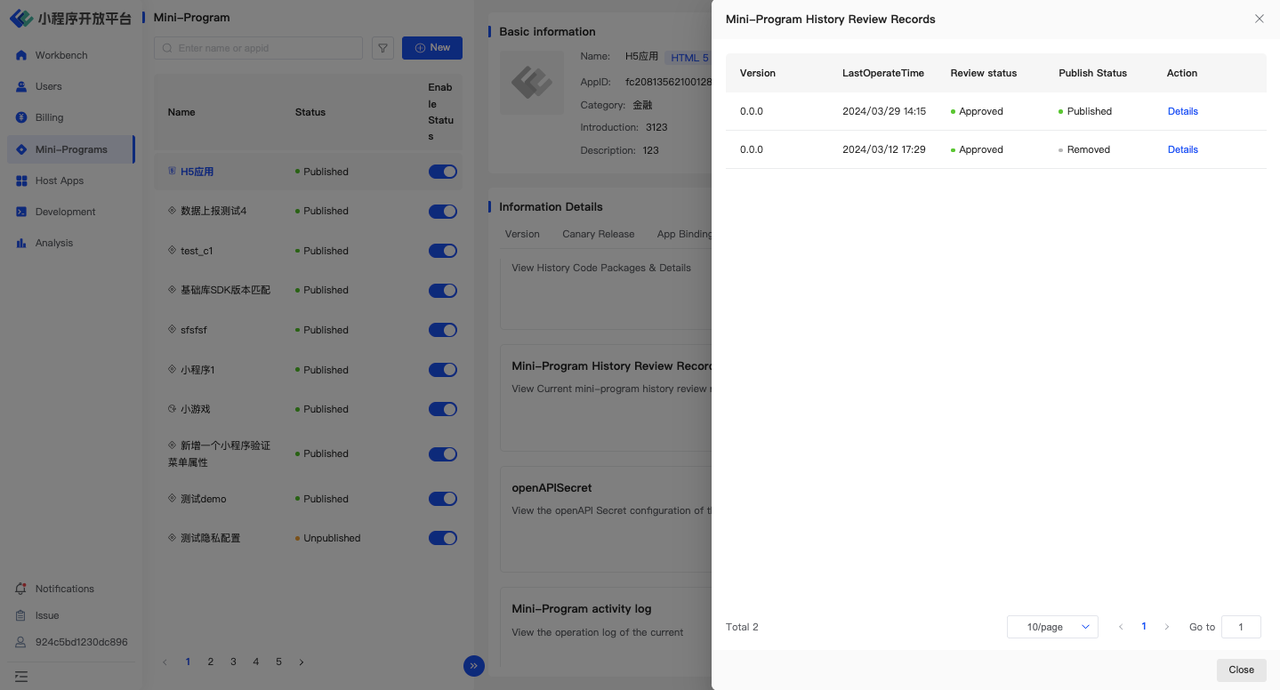
In 「Mini-Programs-Basic Information-Other-Mini-Program History Review Records」, you can view the review records of the current version of the mini-program.
5.3 Mini-Program Publishing and Unpublishing
If you checked “Automatically publish after passing the review” when submitting the mini-program for review, the mini-program will automatically be published as an online version after passing the review. Otherwise, you will need to manually manage the process.
Publishing and Unpublishing

Path:Mini-Program-Basic Information-Version
- If there is no online version, you can 「Submit for Online」.
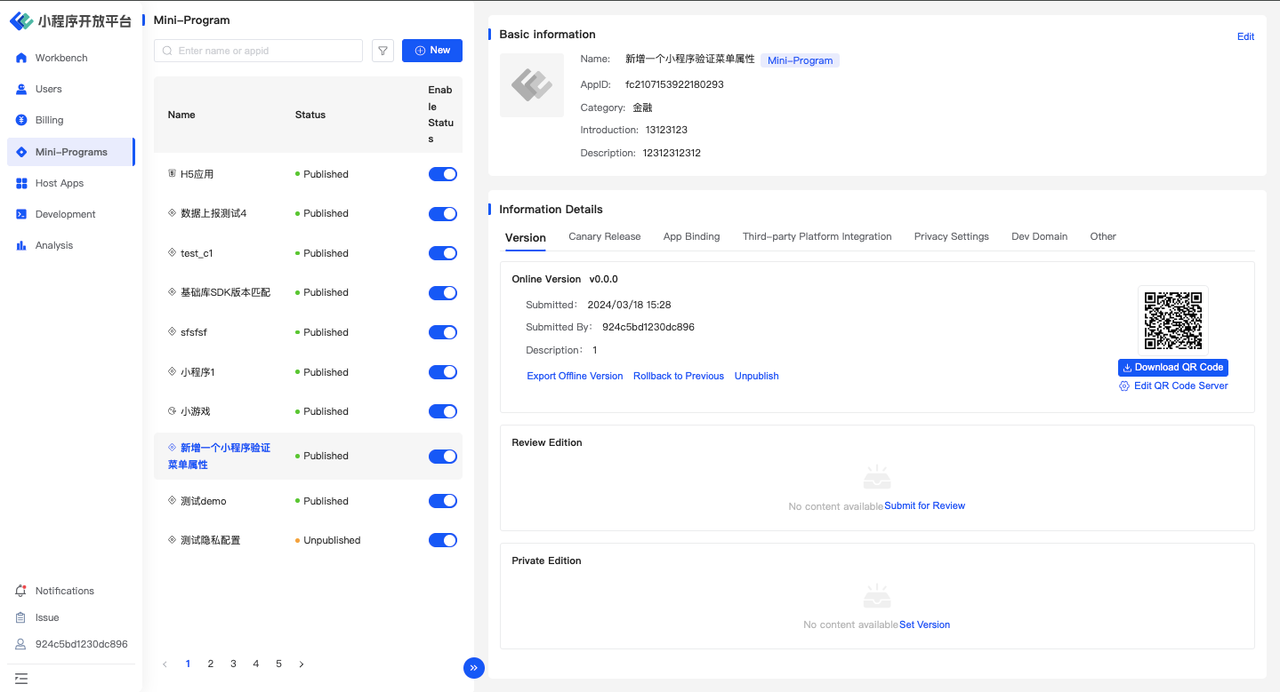
- If there is an online version, you can perform operations such as 「Export Offline Version」, 「Rollback to Previous」, and 「Unpublish」
- If there is an approved version, you can「Publish to Online Version」; if there is no version under review, you can 「Submit for Review」.
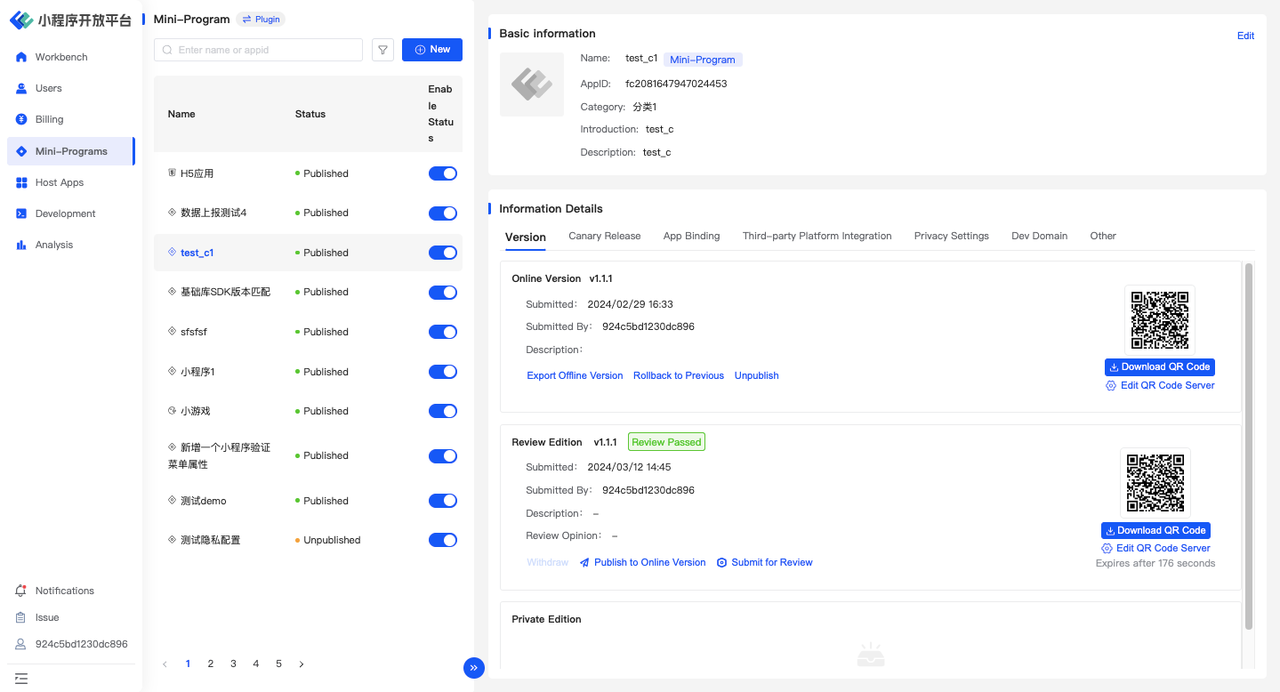
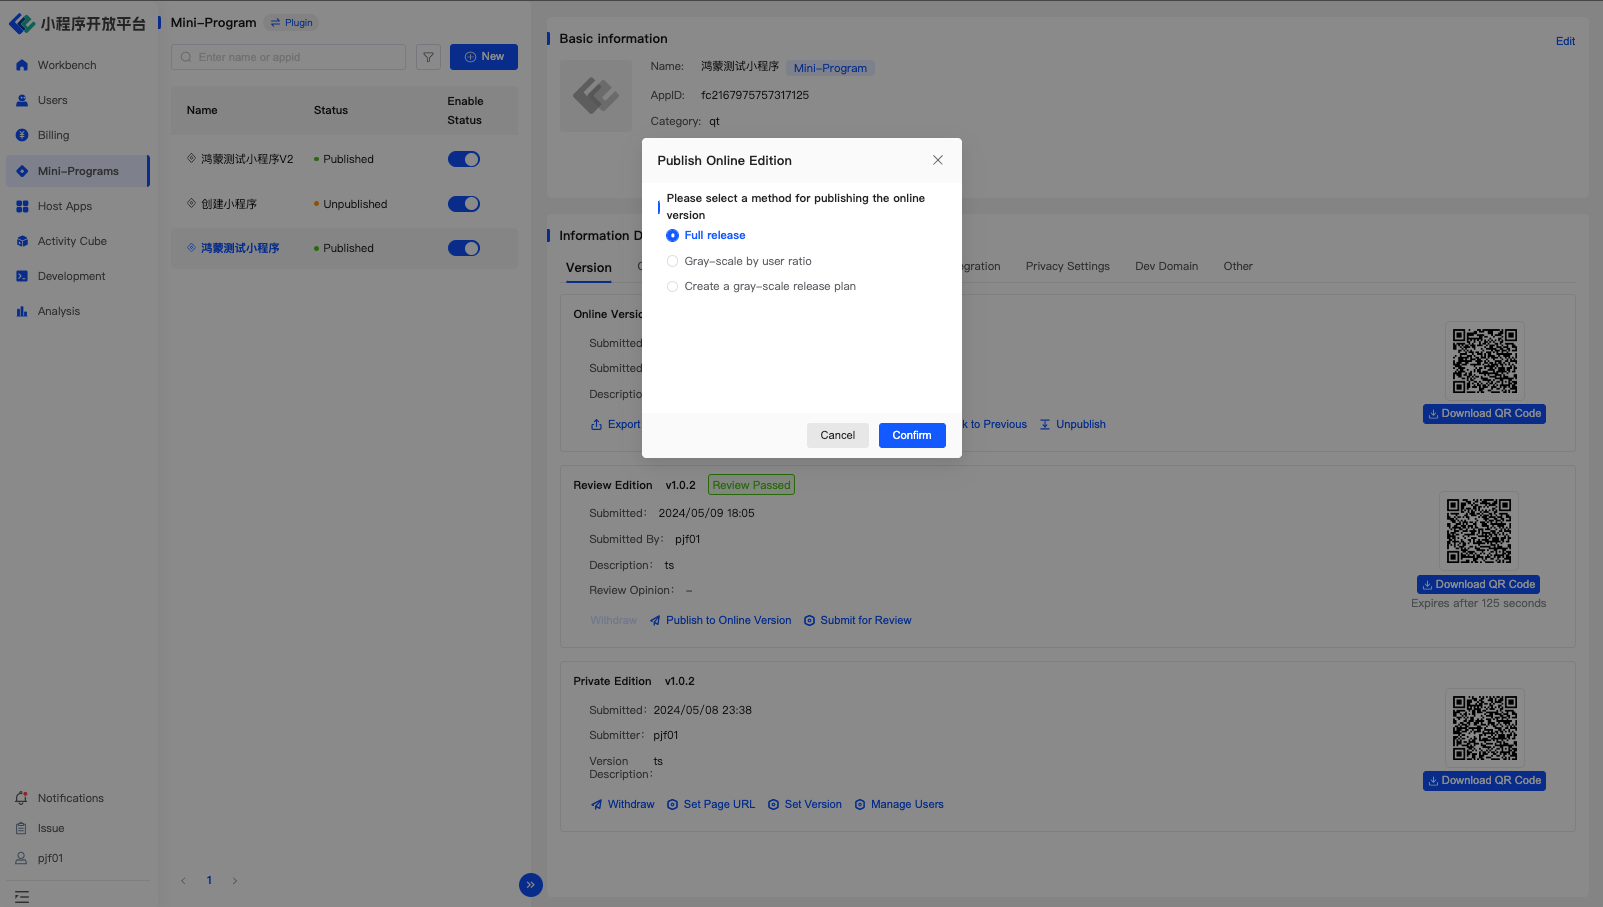
Clicking 「Publish to Online Version」, you can choose:
- Full Release
- User Ratio Greyscale: Can be considered as a quick greyscale release based on the user ratio dimension.
- Create Greyscale Release Plan: Allows for detailed setup of the greyscale release plan.


Canary Release
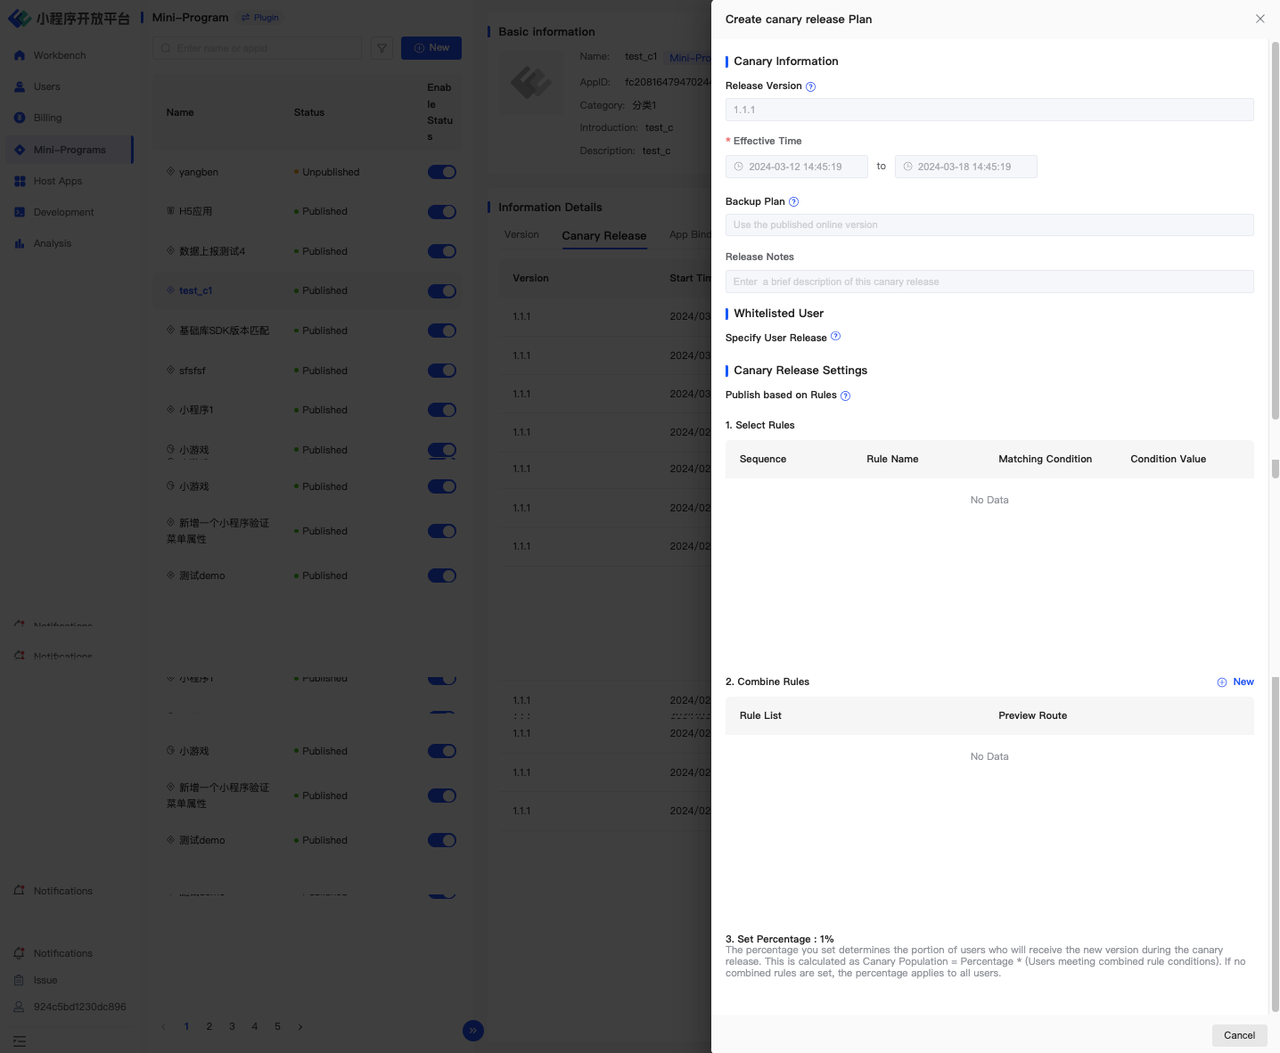
Create a canary release plan according to specific rules as shown in the figure below; for more rule configurations, you can go to 「Development-Canary Rule」for settings.
Additionally, you can view all the mini-program versions that are available for release/in the process of being released/pending release/ended in 「Mini-program - Details - Canary Release」. For versions of the 「Review Passed」status, you can also click 「New」 to perform a detailed phased rollout.
6.Host Apps
After completing the relevant work for adding a mini-program, we need to configure the information of the host app in the FinClip Mini-Program Open Platform. Only after configuring the relevant information of the host app can the mini-program run normally in the specified host app.
6.1 Add an App
Path:Host Apps-New
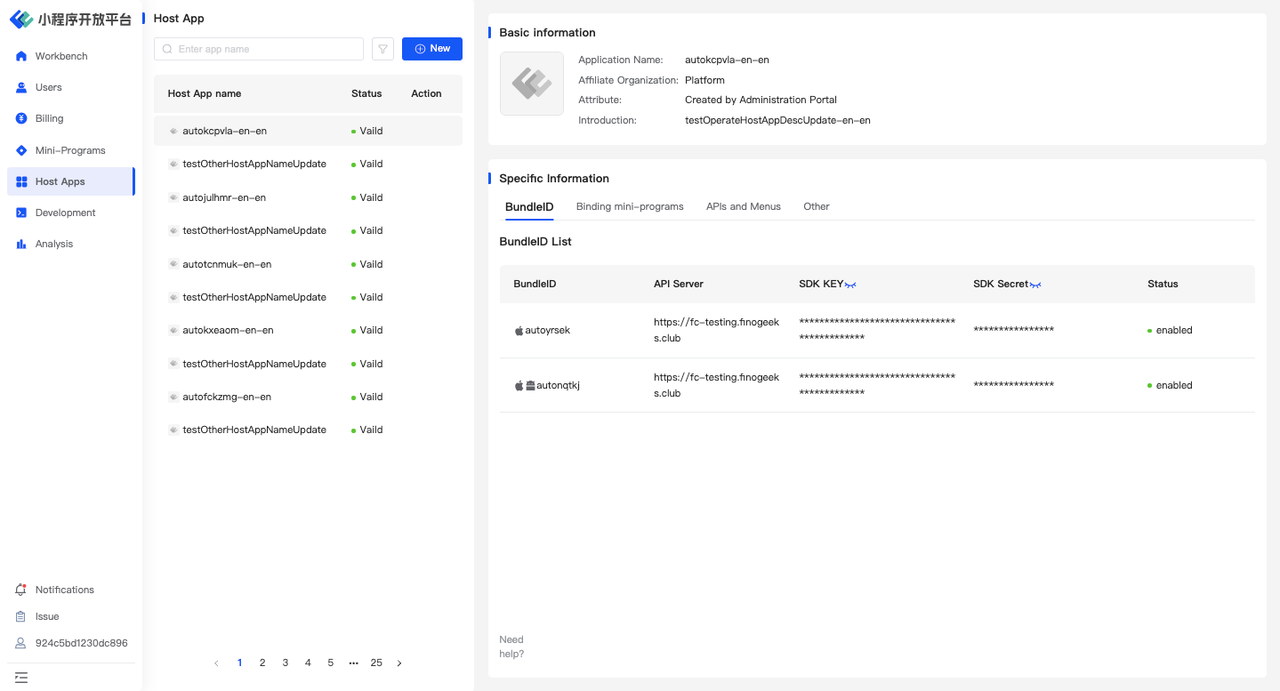
When adding an app, you need to fill in the app name and the name of the enterprise to which the app belongs, upload an icon, and decide whether the application is visible to other teams and whether the BundleID is visible to other teams. Among these:
- The app name can be modified later.
- The enterprise to which the app belongs cannot be changed.

6.2 Configure the BundleID
After adding an app, you also need to configure the related Bundle ID to generate the corresponding SDK KEY and SDK SECRET, thereby completing the app linking operation;
Path:Host APPS-Details-BundleID-ADD
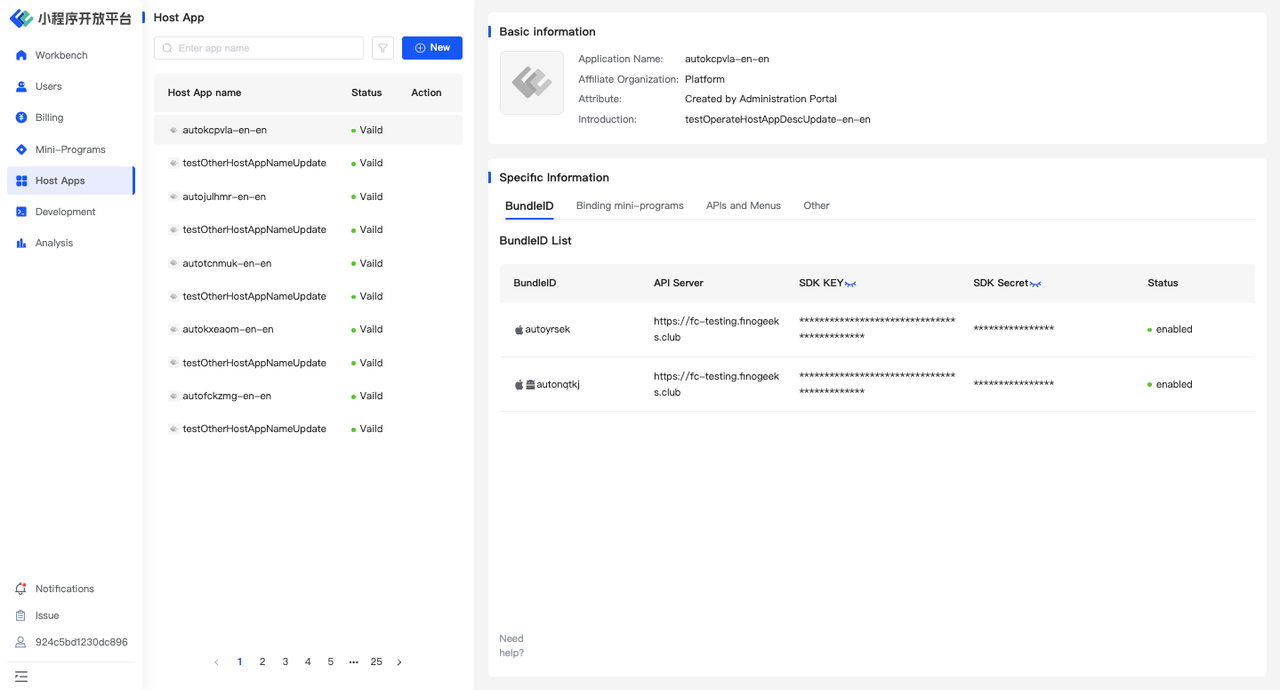

If the Bundle IDs for iOS and Android are the same, you only need to check 「Android/iOS Universal」 and add one Bundle ID.
6.3 Configure SDK Key & Secret
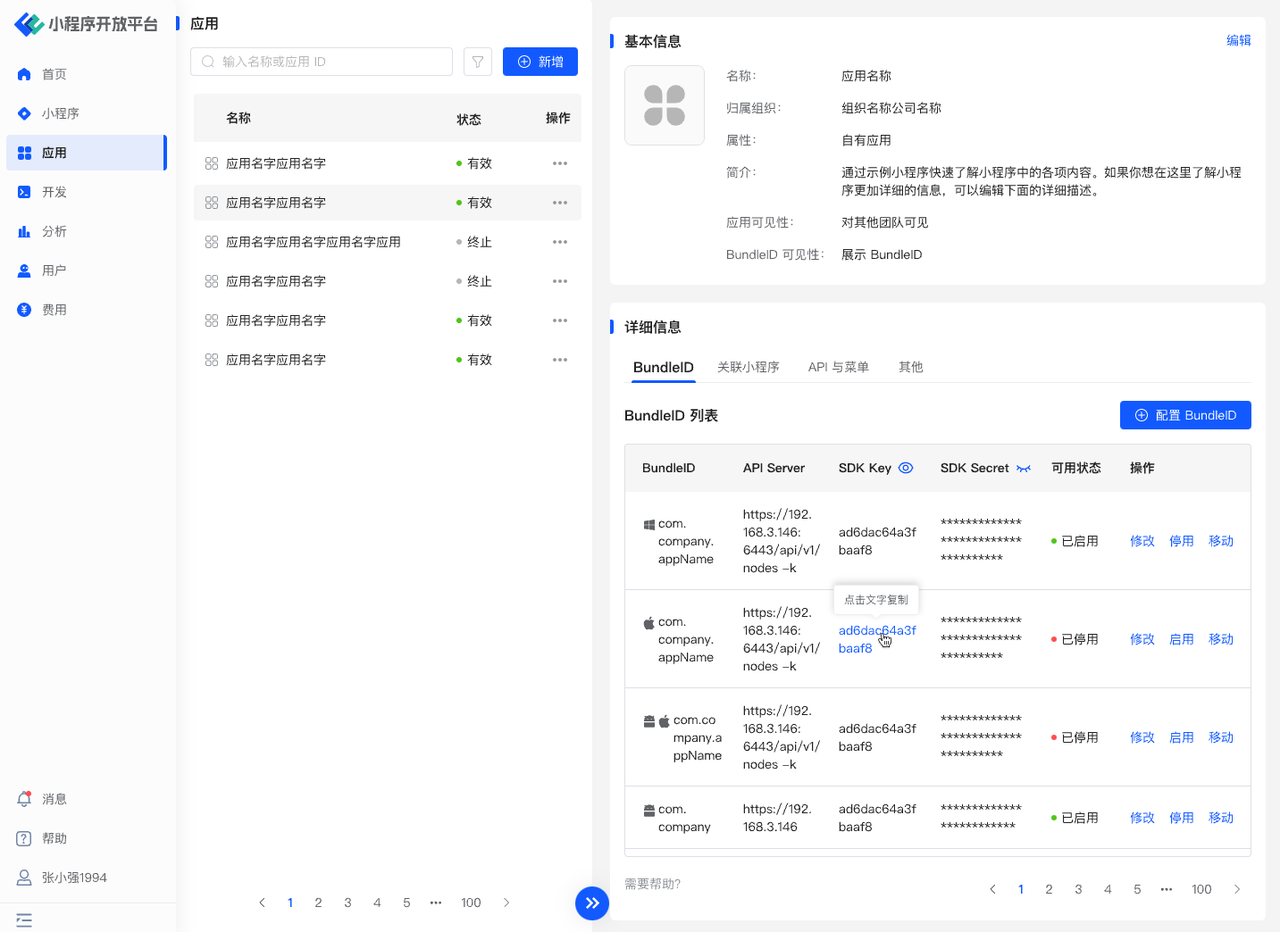
When opening a mini-program in the host application, the SDK will decrypt based on the current App's BundleID, SDK Key & Secret. The mini-program can only run normally if they are correctly configured.
Therefore, you need to copy the corresponding Key and Secret on the right side of the corresponding BundleID and fill them into the fields during SDK initialization according to the SDK configuration documentation.
6.4 Bind Mini-Programs
To open a mini-program within a specified application, you need to link the mini-program and the application.
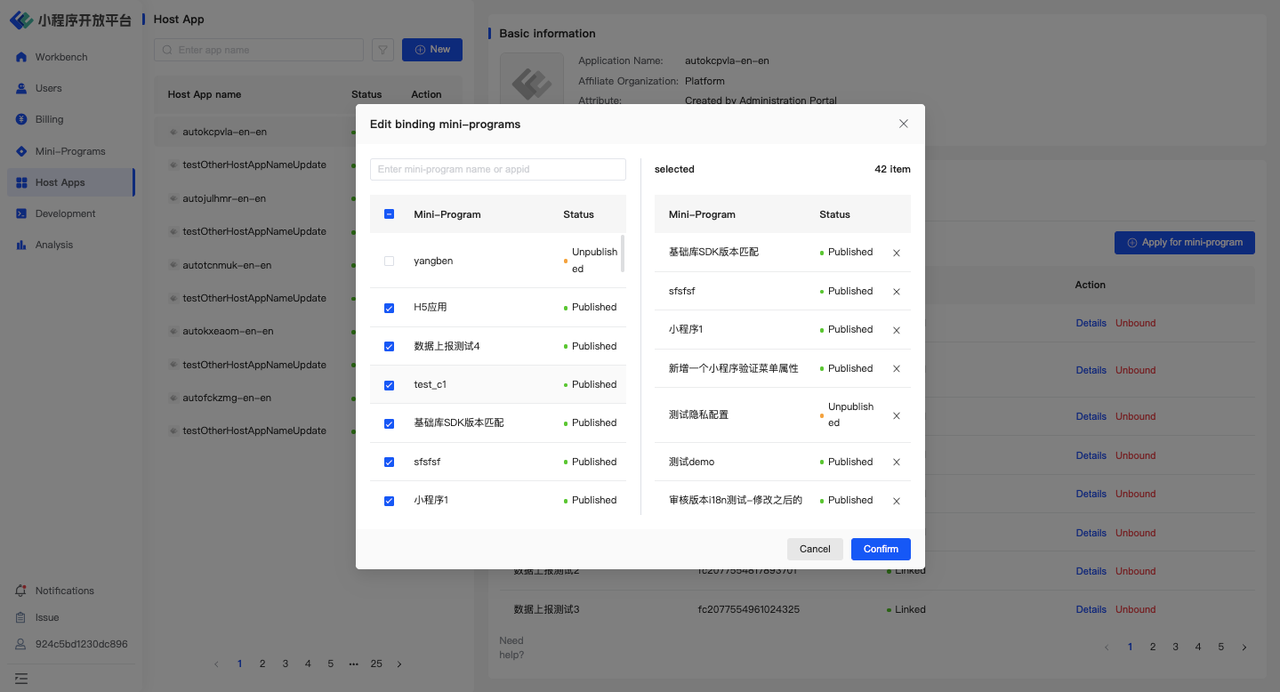
Path:Host Apps-Basic Information-Binding mini-program-Apply for mini-program
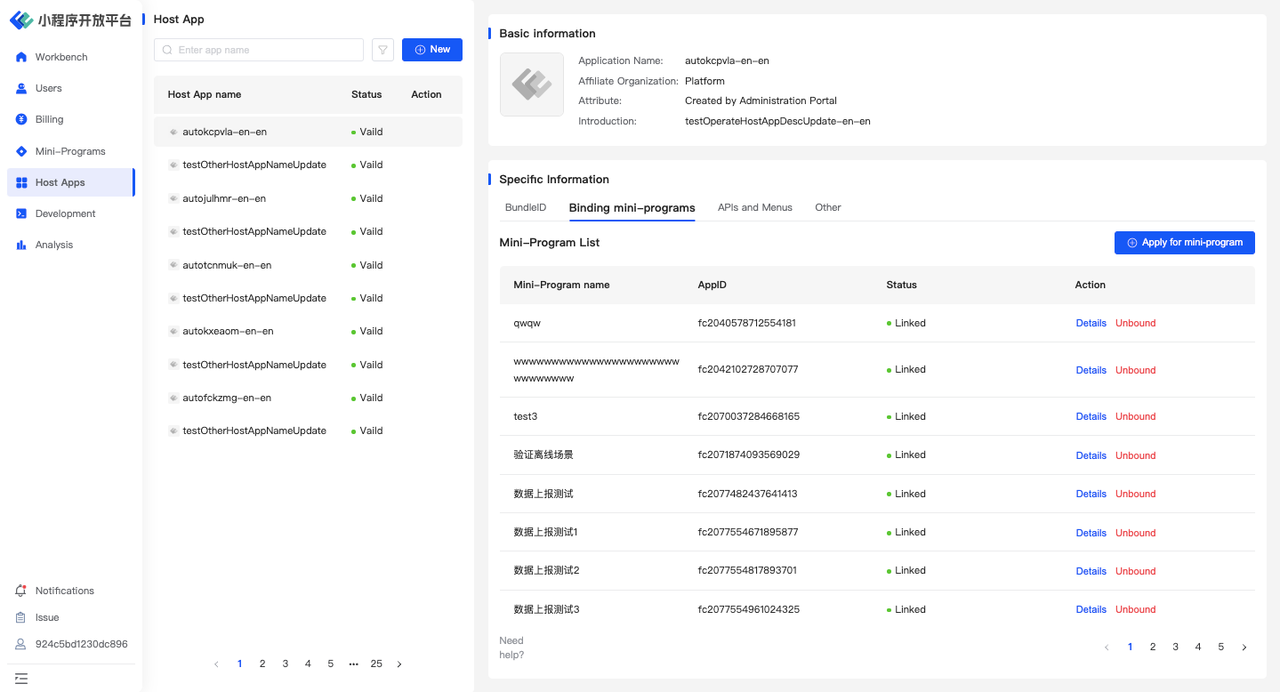
In the popup, select the mini-program to link, as shown in the following image. After selecting the mini-program, the third-party application will also need to add a mini-program entry in their own APP to enable users to access it normally;
Note:
For private customers after purchase, it can be set whether a review by the Administration Portal is needed. That is: after the Developer Portal adds a link to the mini-program, it must wait for the Administration Portal's review. If the Administration Portal does not approve, the mini-program in the Developer Portal will not be able to open in the corresponding application;
When linking a mini-program with a host app, the following points need attention:
- The collaborating app must integrate the FinClip mini-program SDK and configure the corresponding SDK Key and Secret;
- Enterprises need to link the published mini-program with the collaborating app to open the corresponding mini-program;
- The mini-program open platform will verify the SDK KEY, app Bundle ID, and the linking relationship of the mini-program. If not linked, the mini-program cannot be opened normally.
For SDK integration instructions, please refer to:
7.User Feedback
The mini-program SDK of the open platform provides an entry for collecting user feedback. By clicking the "..." in the top left corner of the mini-program, you can see the entry for complaints and feedback, as shown in the following image:
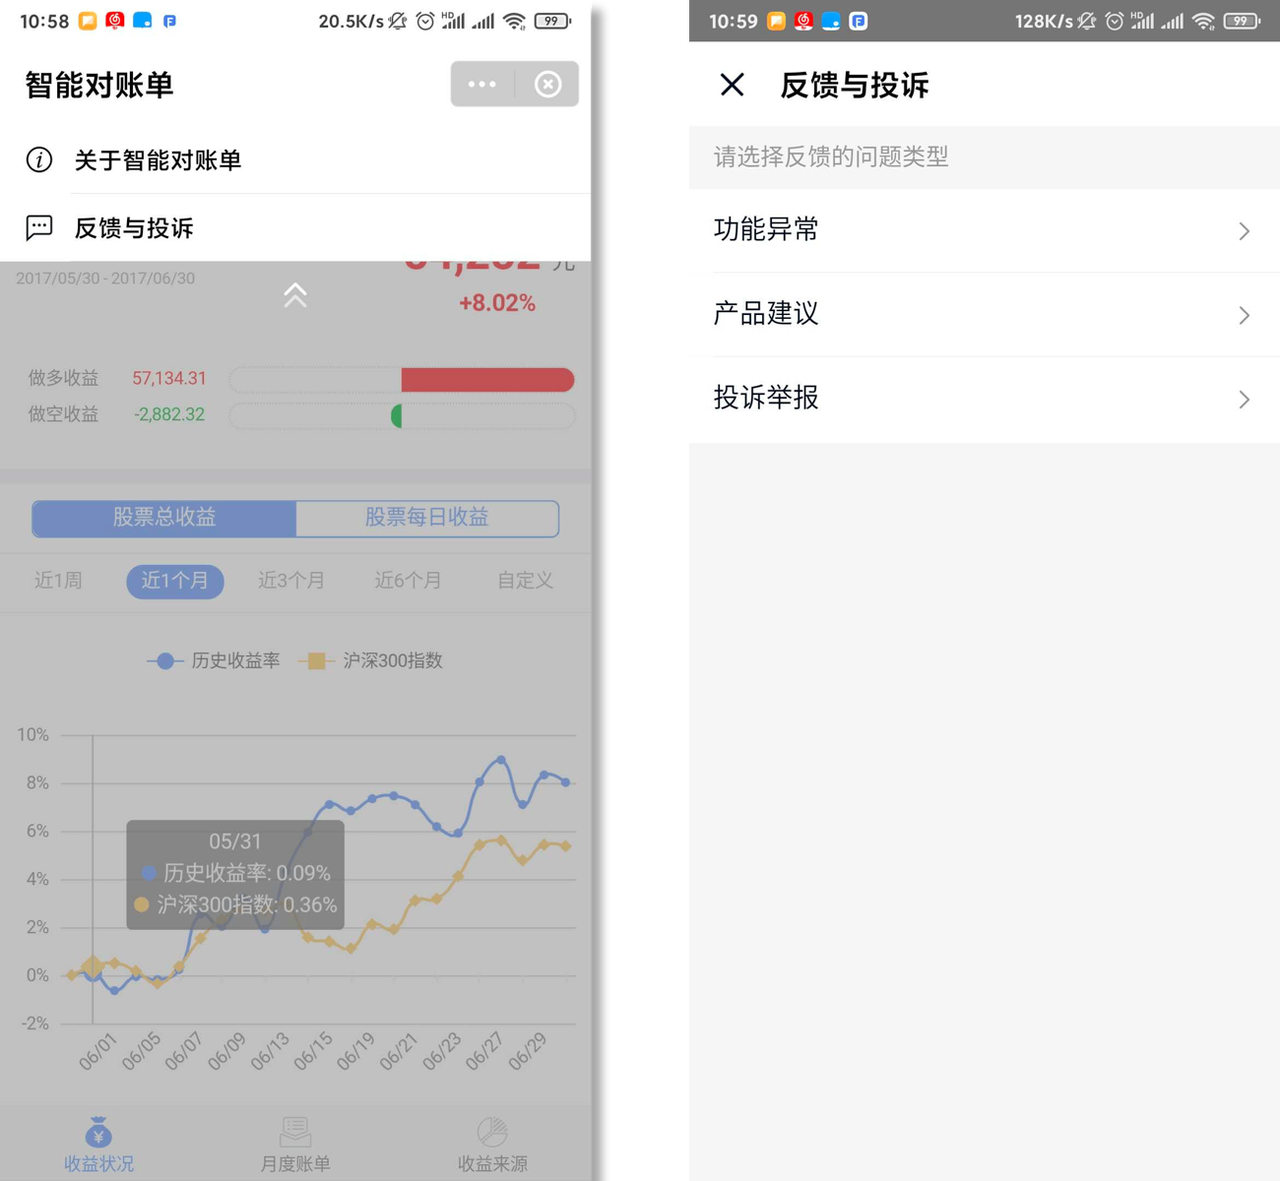
Feedback on 「功能异常」 and 「产品建议」 will be collected in the Developer Portal under "Workbench - workflow - Feedbacks". Please address these in a timely manner.
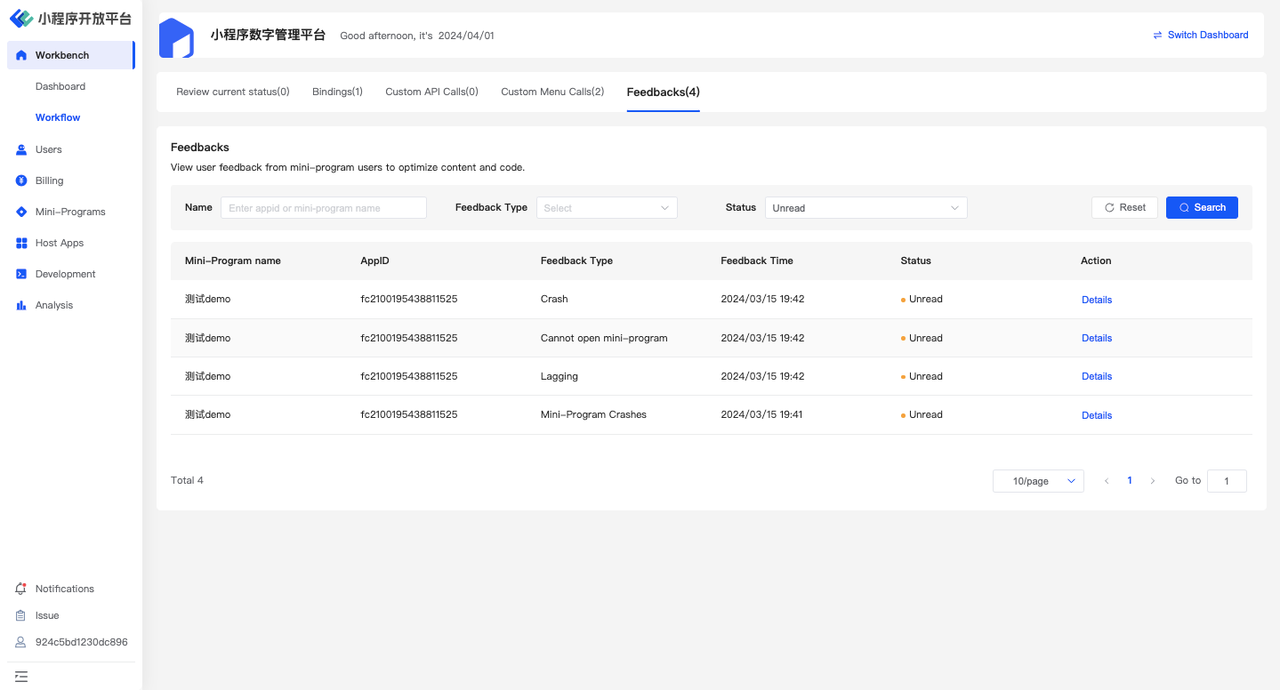
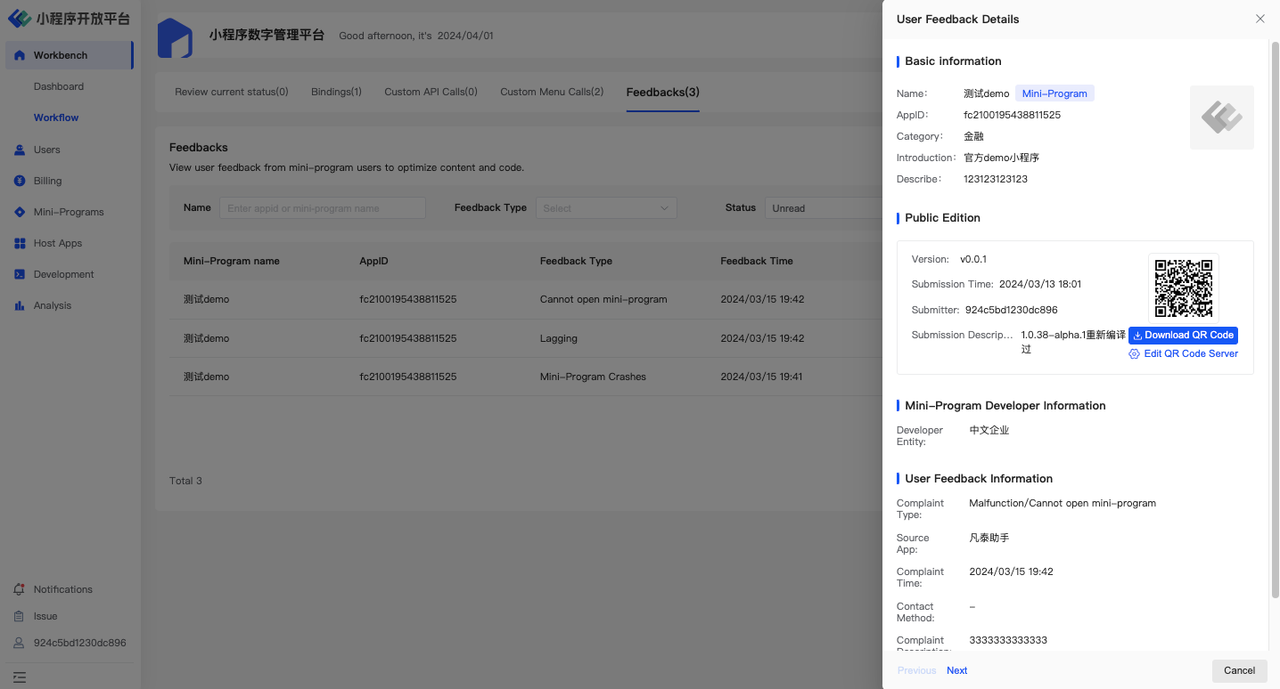
Of course, the aforementioned complaints can also be viewed and managed through the Issue located at the bottom left corner of the screen.

8.Workflow
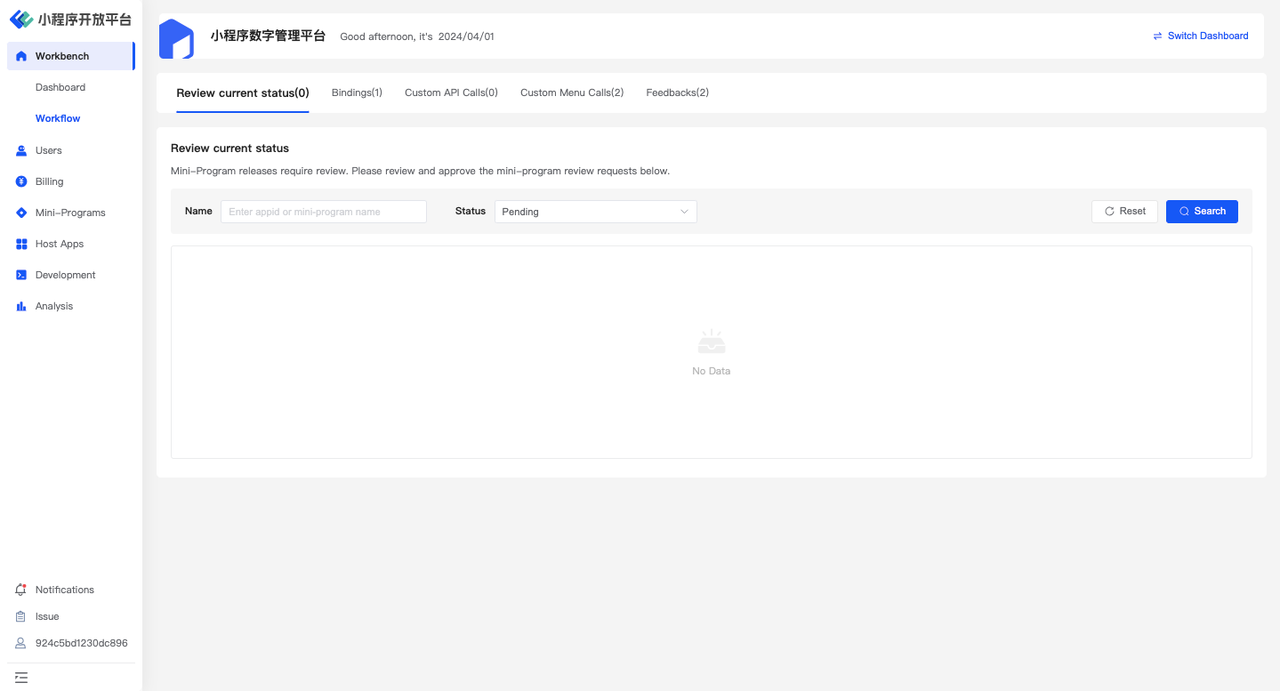
For other actions that require your attention, you can enter through the 「Workflow」entry on the Workbench page. It will include related business processes you need to handle, such as Review current status,Bindings, Custom API calls, and other related operations. The Workflow allows you to quickly enter into business processes that need attention, helping you to carry out related work.
9.FinClip APP Usage Instructions
Developers can get extensive development assistance through the "FinClip APP". For downloading, please go to: 「 FinClip APP 」 download link.
Usage Instructions:
- Install the "FinClip APP" and 「登录」.
- Scan to open mini-programs: Allows opening of all mini-programs on the platform for convenient developer debugging.
- Manage mini-programs: Developers can quickly view the mini-programs they have created and conveniently open code packages that have been successfully uploaded.
