在做微信开发的时候我们会遇到各种功能,本文就和大家分享要实现一个流程进度的图样式的方法。
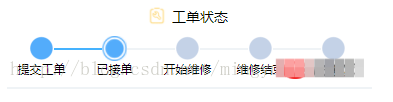
需求:
没完成的灰色小圆点表示
完成的使用蓝色小圆点设置
当前状态使用有外圈的小圆点表示
实现起来比较简单,实现思路,使用一个列表实现,列表中的每一个item的样式如下图

使用win10画板画的不好看
图上的意思就是每个item 前面有一段线条 中间是个圆圈然后后面有一段线条。之所以这样是因为下面的文字需要居中显示在圆圈的下面。如果不需要文字的话可以一个圆圈后面跟一条直线会更简单一点。
按照上面的图片,html布局为下面
1 2 3 4 5 6 7 8 9 10 | <view class='order_process'>
<view class='process_wrap' wx:for="{{processData}}" wx:key="">
<view class='process'>
<view class='process_line' style="background:{{item.start}}"></view>
<image class='process_icon' src="{{item.icon}}"></image>
<view class='process_line' style="background:{{item.end}}"></view>
</view>
<text class='process_name'>{{item.name}}</text>
</view>
</view>
|
OK 列表肯定需要一个数组啦数组如下面
1 2 3 4 5 6 7 8 9 10 11 12 13 14 15 16 17 18 19 20 21 22 23 24 25 26 27 28 29 30 31 | processData: [{
name: '提交工单',
start: '#fff',
end: '#EFF3F6',
icon: '../../img/process_1.png'
},
{
name: '已接单',
start: '#EFF3F6',
end: '#EFF3F6',
icon: '../../img/process_1.png'
},
{
name: '开始维修',
start: '#EFF3F6',
end: '#EFF3F6',
icon: '../../img/process_1.png'
},
{
name: '维修结束',
start: '#EFF3F6',
end: '#EFF3F6',
icon: '../../img/process_1.png'
},
{
name: '已确认',
start: '#EFF3F6',
end: '#fff',
icon: '../../img/process_1.png'
}],
},
|
按照上面的item图片我们会看到直接显示的话两边会多处一条线来怎么去掉这两条线呢,很简单,让父容器的背景颜色跟先的颜色一样就好啦。
把父布局的背景改为白色,然后控制列表中第一个item中的前面的线段的颜色为白色,最后一个item中的后面的线段为白色。这样看起来两边的线段就去掉了
当数据改变的时候,我们只需要改变数组中对象的属性就好了。不如下面的做参考
1 2 3 4 5 6 7 8 9 10 11 12 13 14 15 16 17 18 19 20 21 22 23 24 25 26 27 | setPeocessIcon: function () {
var index = 0
var processArr = this.data.processData
for (var i = 0; i < this.data.detailData.progress.length; i++) {
var item = this.data.detailData.progress[i]
processArr[i].name = item.word
if (item.state == 1) {
index = i
processArr[i].icon = "../../img/process_3.png"
processArr[i].start = "#45B2FE"
processArr[i].end = "#45B2FE"
} else {
processArr[i].icon = "../../img/process_1.png"
processArr[i].start = "#EFF3F6"
processArr[i].end = "#EFF3F6"
}
}
processArr[index].icon = "../../img/process_2.png"
processArr[index].end = "#EFF3F6"
processArr[0].start = "#fff"
processArr[this.data.detailData.progress.length - 1].end = "#fff"
this.setData({
processData: processArr
})
},
|
上面代码的数据中,使用state代表完成和没完成。我们把完成的设置为蓝色 把没完成的设置为灰色。
使用 index 来记录是不是当前点(当前点就是state表示完成的最后一个)。
最后css中的代码也很简单
1 2 3 4 5 6 7 8 9 10 11 12 13 14 15 16 17 18 19 20 21 22 23 24 25 26 27 28 29 30 31 32 33 34 | .order_process {
display: flex;
flex-wrap: nowrap;
padding: 10rpx 10rpx 20rpx 10rpx;
background-color: #fff;
}
.process_wrap {
display: flex;
flex-direction: column;
flex: 1;
align-items: center;
}
.process {
display: flex;
align-items: center;
width: 100%;
}
.process_icon {
width: 50rpx;
height: 50rpx;
}
.process_line {
background: #eff3f6;
flex: 1;
height: 5rpx;
}
.process_name {
font-size: 24rpx;
}
|
版权声明:本文内容由网络用户投稿,版权归原作者所有,本站不拥有其著作权,亦不承担相应法律责任。如果您发现本站中有涉嫌抄袭或描述失实的内容,请联系我们jiasou666@gmail.com 处理,核实后本网站将在24小时内删除侵权内容。


暂时没有评论,来抢沙发吧~