这篇文章主要介绍了微信小程序开发图片拖拽实例详解的相关资料,需要的朋友可以参考下
微信小程序开发图片拖拽实例详解
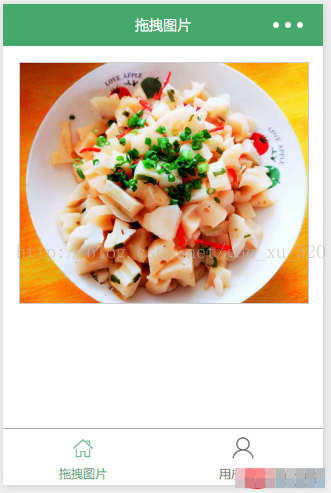
1.编写页面结构:moveimg.wxml
1 2 3 4 5 6 | <view class="container">
<view class="cnt">
<image class="image-style" src="../uploads/foods.jpg" style="left:{{ballleft}}px;width:{{screenWidth}}px" bindtouchmove="ballMoveEvent">
</image>
</view>
</view>
|
2.编写页面样式:moveimg.wxss
1 2 3 4 5 6 7 8 9 10 11 12 13 14 15 16 17 | .container {
box-sizing:border-box;
padding:1rem;
}
-t{
width:100%;
height:15rem;
border: 1px solid #ccc;
position:relative;
overflow: hidden;
}
.image-style{
position: absolute;
top: 0px;
left:0px;
height:100%;
}
|
3.设置数据:moveimg.js
1 2 3 4 5 6 7 8 9 10 11 12 13 14 15 16 17 18 19 20 21 22 23 24 25 26 27 28 29 30 31 32 33 34 35 36 37 | var app = getApp()
Page({
data: {
ballleft:-20,
screenWidth: 0,
},
onLoad: function() {
var _this = this;
wx.getSystemInfo({
success: function(res) {
_this.setData({
screenHeight: res.windowHeight,
screenWidth: res.windowWidth,
});
}
});
},
ballMoveEvent: function(e) {
var touchs = e.touches[0];
var pageX = touchs.pageX;
console.log('宽度 '+this.data.screenWidth)
console.log('pageX: ' + pageX);
var x = this.data.screenWidth/2 - pageX-20;
if(this.data.screenWidth>385){
if(x>42){x=42;}
}else{
if(x>32){x=32;}
}
if(x<0){x=0;}
console.log('x:' + x)
this.setData({
ballleft: -x
});
}
})
|
这几天一直在研究图片裁剪,思路是有,可是却遇到各种问题。可怜编程不易啊。
想了好久,决定还是简单开始吧。如果大家有更好的方式或是其他想法,欢迎提出,一起讨论。
以上就是本文的全部内容,希望对大家的学习有所帮助。
版权声明:本文内容由网络用户投稿,版权归原作者所有,本站不拥有其著作权,亦不承担相应法律责任。如果您发现本站中有涉嫌抄袭或描述失实的内容,请联系我们jiasou666@gmail.com 处理,核实后本网站将在24小时内删除侵权内容。


暂时没有评论,来抢沙发吧~