这篇文章主要介绍了微信小程序 input表单与redio及下拉列表的使用实例的相关资料,希望通过本文能帮助到大家,需要的朋友可以参考下
微信小程序 input表单与redio及下拉列表的使用实例
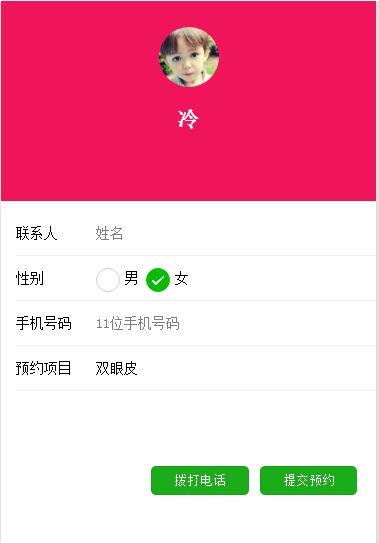
一个简单的预约类型的表单,效果

主要代码:
1 2 3 4 5 6 7 8 9 10 11 12 13 14 15 16 17 18 19 20 21 22 23 24 25 26 27 28 29 30 31 32 33 34 35 36 37 38 39 40 41 42 43 44 45 | <form bindsubmit="bindSave">
<view class="form-box">
<view class="row-wrap">
<view class="label">联系人</view>
<view class="label-right">
<input name="userName" class="input" type="text" placeholder="姓名" value="{{addressData.userName}}" />
</view>
</view>
<view class="row-wrap">
<view class="label">性别</view>
<radio-group class="radio-group" bindchange="radioChange">
<label class="radio" wx:for="{{items}}">
<radio value="{{item.name}}" checked="{{item.checked}}" />{{item.value}}
</label>
</radio-group>
</view>
<view class="row-wrap">
<view class="label">手机号码</view>
<view class="label-right">
<input name="mobile" class="input" maxlength="11" type="number" placeholder="11位手机号码" value="{{addressData.mobile}}" />
</view>
</view>
<view class="row-wrap">
<view class="label">预约项目</view>
<picker bindchange="bindCasPickerChange" value="{{casIndex1}}" range="{{casArray}}">
<view>
<text>{{casArray[casIndex]}}</text>
</view>
</picker>
</view>
</view>
<view class="btn-tyc">
<button size="mini" bindtap="tapAddCart" class="submit" type="primary" formType="submit">提交预约</button>
</view>
<button size="mini" bindtap="tlp_phone" class="phone" type="primary">拨打电话</button>
</form>
|
.js文件
1 2 3 4 5 6 7 8 9 10 11 12 13 14 15 16 17 18 19 20 21 22 23 24 25 26 27 28 29 | data: {
nickName: "",
avatarUrl: "",
casArray: ['双眼皮', 'TBM', '隆胸', '减肥', 'qita'],
userName: '',
mobile: '',
Gender: 'female',
casIndex: 0,
items: [
{ name: 'male', value: '男' },
{ name: 'female', value: '女', checked: 'true' },
]
},
radioChange: function (e) {
console.log('值:', e.detail.value)
this.setData({
Gender: e.detail.value
})
},
bindCasPickerChange: function (e) {
console.log(this.data.casArray);
console.log('下拉选择的是', this.data.casArray[e.detail.value])
this.setData({
casIndex: e.detail.value
})
},
|
具体的表单样式可以自己调整,wxss样式文件代码不写了
参照官方文档form组件
https://mp.weixin.qq.com/debug/wxadoc/dev/component/form.html
以上就是本文的全部内容,希望对大家的学习有所帮助。
版权声明:本文内容由网络用户投稿,版权归原作者所有,本站不拥有其著作权,亦不承担相应法律责任。如果您发现本站中有涉嫌抄袭或描述失实的内容,请联系我们jiasou666@gmail.com 处理,核实后本网站将在24小时内删除侵权内容。


暂时没有评论,来抢沙发吧~