一、生命周期
先贴两张图:
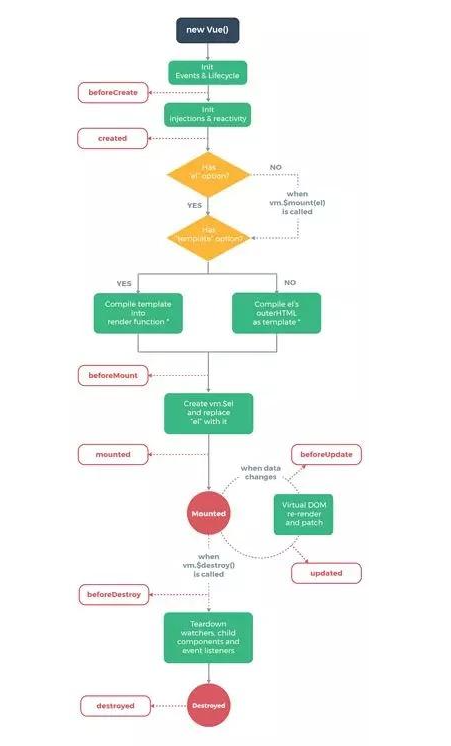
vue生命周期
小程序生命周期
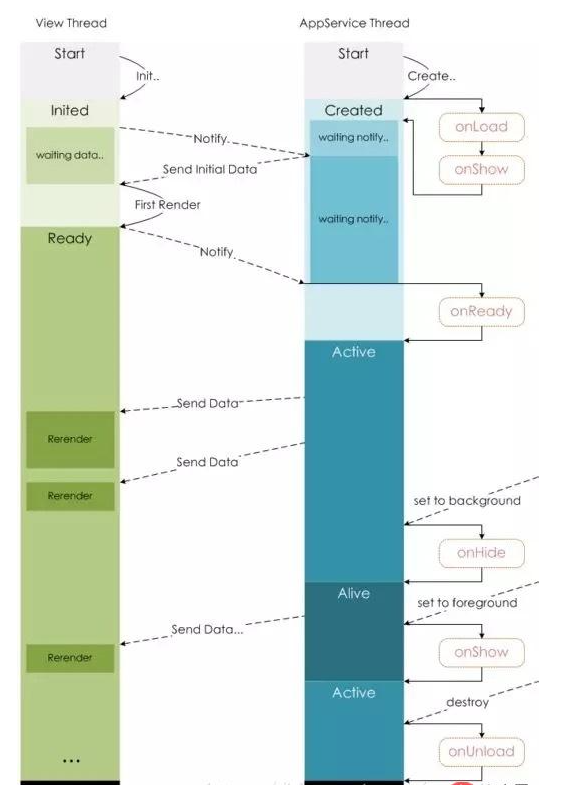
相比之下,小程序的钩子函数要简单得多。
vue的钩子函数在跳转新页面时,钩子函数都会触发,但是小程序的钩子函数,页面不同的跳转方式,触发的钩子并不一样。onLoad:页面加载
一个页面只会调用一次,可以在 onLoad 中获取打开当前页面所调用的 query 参数。
onShow:页面显示
每次打开页面都会调用一次。
onReady:页面初次渲染完成
一个页面只会调用一次,代表页面已经准备妥当,可以和视图层进行交互。
对界面的设置如 wx.setNavigationBarTitle请在 onReady之后设置。详见生命周期。
onHide:页面隐藏
当 navigateTo或底部tab切换时调用。
onUnload:页面卸载
当 redirectTo或 navigateBack的时候调用。
数据请求
在页面加载请求数据时,两者钩子的使用有些类似,vue一般会在 created或者 mounted中请求数据,而在小程序,会在 onLoad或者 onShow中请求数据。
二、数据绑定
vue:vue动态绑定一个变量的值为元素的某个属性的时候,会在变量前面加上冒号:,例:
1 | <img :src="imgSrc"/ alt="Vue 和微信小程序的区别有哪些?对比分析" >
|
小程序:绑定某个变量的值为元素属性时,会用两个大括号括起来,如果不加括号,为被认为是字符串。例:
1 | <image src="{{imgSrc}}"></image>
|
三、列表渲染
直接贴代码,两者还是有些相似:
vue:
1 2 3 4 5 6 7 8 9 10 11 12 13 14 15 | <ul id="example-1">
<li v-for="item in items">
{{ item.message }}
</li>
</ul>
var example1 = new Vue({
el: '#example-1',
data: {
items: [
{ message: 'Foo' },
{ message: 'Bar' }
]
}
})
|
小程序:
1 2 3 4 5 6 7 8 9 10 | Page({
data: {
items: [
{ message: 'Foo' },
{ message: 'Bar' }
]
}
})
<text wx:for="{{items}}">{{item}}</text>
|
四、显示与隐藏元素
vue中,使用 v-if 和 v-show控制元素的显示和隐藏。
小程序中,使用 wx-if和 hidden控制元素的显示和隐藏。
五、事件处理
vue:使用 v-on:event绑定事件,或者使用 @event绑定事件,例如:
1 2 | <button v-on:click="counter += 1">Add 1</button>
<button v-on:click.stop="counter+=1">Add1</button>
|
小程序中,全用 bindtap(bind+event),或者 catchtap(catch+event)绑定事件,例如:
1 2 | <button bindtap="noWork">明天不上班</button>
<button catchtap="noWork">明天不上班</button>
|
六、数据双向绑定
1、设置值
在vue中,只需要再表单元素上加上 v-model,然后再绑定 data中对应的一个值,当表单元素内容发生变化时, data中对应的值也会相应改变,这是vue非常nice的一点。
1 2 3 4 5 6 7 8 9 10 | <p id="app">
<input v-model="reason" placeholder="填写理由" class='reason'/>
</p>
new Vue({
el: '#app',
data: {
reason:''
}
})
|
但是在小程序中,却没有这个功能。那怎么办呢?
当表单内容发生变化时,会触发表单元素上绑定的方法,然后在该方法中,通过 this.setData({key:value})来将表单上的值赋值给 data中的对应值。
下面是代码,可以感受一下:
1 2 3 4 5 6 7 8 9 10 11 12 | <input bindinput="bindReason" placeholder="填写理由" class='reason' value='{{reason}}' name="reason" />
Page({
data:{
reason:''
},
bindReason(e) {
this.setData({
reason: e.detail.value
})
}
})
|
当页面表单元素很多的时候,更改值就是一件体力活了。和小程序一比较,vue的 v-model简直爽的不要不要的。
2、取值
vue中,通过 this.reason取值。
小程序中,通过 this.data.reason取值。
七、绑定事件传参
在vue中,绑定事件传参挺简单,只需要在触发事件的方法中,把需要传递的数据作为形参传入就可以了,例如:
1 2 3 4 5 6 7 8 9 | <button @click="say('明天不上班')"></button>
new Vue({
el: '#app',
methods:{
say(arg){
consloe.log(arg)
}
}
})
|
在 小程序中,不能直接在绑定事件的方法中传入参数,需要将参数作为属性值,绑定到元素上的 data-属性上,然后在方法中,通过 e.currentTarget.dataset.*的方式获取,从而完成参数的传递,很麻烦有没有...
1 2 3 4 5 6 7 8 9 | <view class='tr' bindtap='toApprove' data-id="{{item.id}}"></view>
Page({
data:{
reason:''
},
toApprove(e) {
let id = e.currentTarget.dataset.id;
}
})
|
八、父子组件通信
1、子组件的使用
在vue中,需要:
1、编写子组件
2、在需要使用的父组件中通过 import引入
3、在 vue的 components中注册
4、在模板中使用
1 2 3 4 5 6 7 8 9 10 11 12 13 14 15 16 17 18 19 20 21 22 23 24 25 26 27 28 29 30 31 32 33 34 35 36 37 38 39 40 41 42 43 44 45 | <template>
<p class="search-box">
<p @click="say" :title="title" class="icon-dismiss"></p>
</p>
</template>
<script>
export default{
props:{
title:{
type:String,
default:''
}
}
},
methods:{
say(){
console.log('明天不上班');
this.$emit('helloWorld')
}
}
</script>
<template>
<p class="container">
<bar :title="title" @helloWorld="helloWorld"></bar>
</p>
</template>
<script>
import Bar from './bar.vue'
export default{
data:{
title:"我是标题"
},
methods:{
helloWorld(){
console.log('我接收到子组件传递的事件了')
}
},
components:{
Bar
}
</script>
|
在小程序中,需要: 1、编写子组件 2、在子组件的 json文件中,将该文件声明为组件
3、在需要引入的父组件的 json文件中,在 usingComponents填写引入组件的组件名以及路径
1 2 3 | "usingComponents": {
"tab-bar": "../../components/tabBar/tabBar"
}
|
4、在父组件中,直接引入即可
1 | <tab-bar currentpage="index"></tab-bar>
|
具体代码:
1 2 3 4 5 6 7 8 9 10 11 12 | <!--components/tabBar/tabBar.wxml-->
<view class='tabbar-wrapper'>
<view class='left-bar {{currentpage==="index"?"active":""}}' bindtap='jumpToIndex'>
<text class='iconfont icon-shouye'></text>
<view>首页</view>
</view>
<view class='right-bar {{currentpage==="setting"?"active":""}}' bindtap='jumpToSetting'>
<text class='iconfont icon-shezhi'></text>
<view>设置</view>
</view>
</view>
|
2、父子组件间通信
在vue中
父组件向子组件传递数据,只需要在子组件通过 v-bind传入一个值,在子组件中,通过 props接收,即可完成数据的传递,示例:
1 2 3 4 5 6 7 8 9 10 11 12 13 14 15 16 17 18 19 20 21 22 23 24 25 26 27 28 29 30 31 32 | <template>
<p class="container">
<bar :title="title"></bar>
</p>
</template>
<script>
import Bar from './bar.vue'
export default{
data:{
title:"我是标题"
},components:{
Bar
}
</script>
<template>
<p class="search-box">
<p :title="title" ></p>
</p>
</template>
<script>
export default{
props:{
title:{
type:String,
default:''
}
}
}
</script>
|
子组件和父组件通信可以通过 this.$emit将方法和数据传递给父组件。
在小程序中
父组件向子组件通信和vue类似,但是小程序没有通过 v-bind,而是直接将值赋值给一个变量,如下:
1 | <tab-bar currentpage="index"></tab-bar>
|
此处, “index”就是要向子组件传递的值。
在子组件 properties中,接收传递的值。
1 2 3 4 5 6 7 | properties: {
currentpage: {
type: String,
value: 'index' // 属性初始值(可选),如果未指定则会根据类型选择一个
}
}
|
子组件向父组件通信和 vue也很类似,代码如下:
1 2 3 4 5 6 7 8 9 10 11 12 13 14 15 16 17 | methods: {
cancelBut: function (e) {
var that = this;
var myEventDetail = { pickerShow: false, type: 'cancel' } // detail对象,提供给事件监听函数
this.triggerEvent('myevent', myEventDetail) //myevent自定义名称事件,父组件中使用
},
}
<bar bind:myevent="toggleToast"></bar>
toggleToast(e){
console.log(e.detail)
}
|
如果父组件想要调用子组件的方法
vue会给子组件添加一个 ref属性,通过 this.$refs.ref的值便可以获取到该子组件,然后便可以调用子组件中的任意方法,例如:
1 2 3 4 | <bar ref="bar"></bar>
this.$ref.bar.子组件的方法
|
小程序是给子组件添加 id或者 class,然后通过 this.selectComponent找到子组件,然后再调用子组件的方法,示例:
1 2 3 4 | <bar id="bar"></bar>
this.selectComponent('#id').syaHello()
|
小程序和vue在这点上太相似了,有木有。。
版权声明:本文内容由网络用户投稿,版权归原作者所有,本站不拥有其著作权,亦不承担相应法律责任。如果您发现本站中有涉嫌抄袭或描述失实的内容,请联系我们jiasou666@gmail.com 处理,核实后本网站将在24小时内删除侵权内容。


暂时没有评论,来抢沙发吧~