react如何构建小程序?下面本篇文章给大家通过1500行代码揭秘react如何运行到小程序平台,介绍一下react 构建小程序两种实现方案,希望对大家有所帮助!

你是否使用过 Taro、Remax 类似的框架?你是否想了解这类框架如何实现 React 代码运行到小程序平台?如果是的话,那么也许你可以花喝一杯咖啡的时间继续往下阅读,本文将通过两种方案实现 React 运行到小程序平台。如果你现在就想阅读这1500行的实现代码,那么可以直接点击项目源码进行获取。
项目描述
为了更清晰描述实现过程,我们把实现方案当作一个项目来对待。
项目需求:使如下计数器功能的 React 代码运行到微信小程序平台。
1 2 3 4 5 6 7 8 9 10 11 12 13 14 15 16 17 18 19 20 21 22 23 24 25 26 27 28 29 30 31 32 33 34 35 36 37 | import React, { Component } from 'react'
import { View, Text, Button } from '@leo/components'
import './index.css'
export default class Index extends Component {
constructor() {
super()
this.state = { count: 0 }
this.onAddClick = this.onAddClick.bind(this)
this.onReduceClick = this.onReduceClick.bind(this)
}
componentDidMount () {
console.log('执行componentDidMount')
this.setState({ count: 1 })
}
onAddClick() {
this.setState({ count: this.state.count + 1 })
}
onReduceClick() {
this.setState({ count: this.state.count - 1 })
}
render () {
const text = this.state.count % 2 === 0 ? '偶数' : '奇数'
return (
<View className="container">
<View className="conut">
<Text>count: {this.state.count}</Text>
</View>
<View>
<Text className="text">{text}</Text>
</View>
<Button onClick={this.onAddClick} className="btn">+1</Button>
<Button onClick={this.onReduceClick} className="btn">-1</Button>
</View>
)
}
}
|
如果使用过 Taro 或者 Remax 等框架,对上述代码应该有似曾相识的感觉,上述代码正式模仿这类框架的 React DSL 写法。如果想迫切看到实现这个需求的效果,可点击此项目源码进行获取源码,然后根据提示运行项目,即可观察到如下效果:

到这里,就清楚了知道这个项目的需求以及最终实现结果是什么,接下来便是重点阐述从需求点到结果这个过程的具体实现。
实现方案
构建小程序框架产物
开发过小程序的同学都知道,小程序框架包含主体和页面,其中主体是由三个文件生组成的,且必须放在根目录,这三个文件分别是: app.js (必需,小程序逻辑),app.json(必需,小程序公共配置),app.wxss(非必须,小程序公共样式表)。所以要将 React 代码构建成小程序代码,首先需要先生成app.js和app.json文件。因为本次转换未涉及到app.js文件,所以app.js内容可以直接写死 App({})代替。app.json是配置文件,可以直接在 React 工程新增一个app.config.js用来填写配置内容,即 React 代码工程目录如下:
1 2 3 4 5 6 7 | ├── src
│ ├── app.config.js
│ └── pages
│ └── index
│ ├── index.css
│ └── index.jsx
└── tsconfig.json
|
app.config.js内容即是小程序全局配置内容,如下:
1 2 3 4 5 6 7 | module.exports = {
pages: ['pages/index/index'],
window: {
navigationBarTitleText: 'react-wxapp',
navigationBarBackgroundColor: '#282c34'
}
};
|
有了这个配置文件,就可以通过如下方式生成app.js和app.json文件。
1 2 3 | fs.writeFileSync(path.join(outputDir, './app.js'), `App({})`)
fs.writeFileSync(path.join(outputDir, './app.json'), JSON.stringify(config, undefined, 2)) // config即为app.config.js文件内容
|
小程序页面则是由四种类型文件构成,分别是js(必需,页面逻辑)、wxml(必需,页面结是构)、json(非必需、页面配置)、wxss(非必需、页面样式表)。而React代码转小程序,主要是考虑如何将React代码转换程序对应的js和wxml类型文件,后文会详细阐述。
React运行到小程序平台方案分析
实现React代码运行到小程序平台上主要有两种方式,一种是编译时实现,一种是运行时实现,如果你已经查看的本项目项目源码,就可以发现源码里也体现出了这两种方式(编译时实现目录:packages/compile-core;运行时实现目录:packages/runtime-core)。
编译时方式主要通过静态编译将 JSX 转换成小程序对应的 template 来实现渲染,类似 Taro1.0 和 2.0,此方式性能接近原生小程序,但是语法却有很大的限制。运行时实现是通过react-reconciler重新在小程序平台定义一个 React 渲染器,使得 React 代码可以真正运行到小程序里,类似 Taro3.0、Remax 等,因此这种方式无语法限制,但是性能会比较差。本项目源码正是参照 Taro、Remax 这类框架源码并简化很多细节进行实现的,因此这个项目源码只是适合来学习的,并不能投入实际业务进行使用。
接下来将分别讲述如何通过编译时和运行时这两种方式来实现 React 运行到小程序平台。
编译时实现
在讲述具体实现流程之前,首先需要了解下编译时实现这个名词的概念,首先这里的编译并非传统的高大上“编译”,传统意义上的编译一般将高级语言往低级语言进行编译,但这里只是将同等水平语言转换,即将javascript代码字符串编译成另一种javascript代码字符串,因此这里的编译更类似于“转译”。其次,虽然这里称编译时实现,并非所有实现过程都是编译的,还是需要少部分实现需要运行时配合,因此这种方式称为重编译轻运行方式更为合适。同样的,运行时实现也含有少量编译时实现,亦可称为重运行轻编译方式。
为了方便实现将javascript代码字符串编译成另一种javascript代码字符串,这里直接采用Babel工具,由于篇幅问题,这里就不详细讲述Babel用法了,如果对Babel不熟的话,可以看看这篇文章简单了解下(没错,就是给自己打广告)。接下来我们来分析编译时实现步骤有哪些:
1. JSX转换成对应小程序的模板
React是通过JSX来渲染视图的,而小程序则通过wxml来渲染视图,要将 React 运行到小程序上,其重点就是要如何实现JSX转换成对应的小程序的wxml,其转换规则就是将JSX使用语法转换成小程序相同功能的语法,例如:
语法转换远不止上面这些类型,如果要保证开发者可以使用各种JSX语法开发小程序,就需要尽可能穷举出所有语法转换规则,否则很可能开发者用了一个写法就不支持转换。而事实是,有些写法(比如动态生成JSX片段等等)是根本无法支持转换,这也是前文为什么说编译时实现方案的缺点是语法有限制,开发者不能随意编码,需要受限于框架本身开发规则。
由于上述需要转换JSX代码语法相对简单,只需要涉及几种简单语法规则转换,这里直接贴出转换后的wxml结果如下,对应的实现代码位于:packages/compile-core/transform/parseTemplate.ts。
1 2 3 4 5 6 7 8 | <view class="container">
<view class="conut"><Text>count: {{count}}</Text></view>
<view>
<text class="text">{{text}}</text>
</view>
<button bindtap="onAddClick" class="btn">+1</button>
<button bindtap="onReduceClick" class="btn">-1</button>
</view>
|
2. 运行时适配
如前文所说,虽然这个方案称为编译时实现,但是要将React代码在小程序平台驱动运行起来,还需要在运行时做下适配处理。适配处理主要在小程序js逻辑实现,内容主要有三块:数据渲染、事件处理、生命周期映射。
小程序js逻辑是通过一个object参数配置声明周期、事件等来进行注册,并通过setData方法触发视图渲染:
1 2 3 4 5 | Component({
data: {},
onReady () { this.setData(..) },
handleClick () {}
})
|
而计数器React代码是通过class声明一个组件逻辑,类似:
1 2 3 4 5 | class CustomComponent extends Component {
state = { }
componentDidMount() { this.setState(..) }
handleClick () { }
}
|
从上面两段代码可以看出,小程序是通过object声明逻辑,React 则是通过class进行声明。除此之外,小程序是通过setData触发视图(wxml)渲染,React 则是通过 setState 触发视图(render方法)渲染。所以要使得 React 逻辑可以运行到小程序平台,可以加入一个运行时垫片,将两者逻辑写法通过垫片对应起来。再介绍运行时垫片具体实现前,还需要对上述 React 计数器代码进行简单的转换处理,处理完的代码如下:
1 2 3 4 5 6 7 8 9 10 11 12 13 14 15 16 17 18 19 20 21 22 23 24 25 26 27 28 29 30 31 32 33 34 35 36 37 38 39 40 41 | import React, { Component } from "../../npm/app.js";
export default class Index extends Component {
static $$events = ["onAddClick", "onReduceClick"];
constructor() {
super();
this.state = {
count: 0
};
this.onAddClick = this.onAddClick.bind(this);
this.onReduceClick = this.onReduceClick.bind(this);
}
componentDidMount() {
console.log('执行componentDidMount');
this.setState({
count: 1
});
}
onAddClick() {
this.setState({
count: this.state.count + 1
});
}
onReduceClick() {
this.setState({
count: this.state.count - 1
});
}
createData() {
this.__state = arguments[0];
const text = this.state.count % 2 === 0 ? '偶数' : '奇数';
Object.assign(this.__state, {
text: text
});
return this.__state;
}
}
Page(require('../../npm/app.js').createPage(Index))。
|
如上代码,需要处理的地方有4处:
Component进行重写,重写逻辑在运行时垫片文件内实现,即app.js,实现具体逻辑后文会贴出。
将原本JSX的点击事件对应的回调方法名称进行收集,以便在运行时垫片在小程序平台进行事件注册。
因为原本render方法内JSX片段转换为wxml了,所以这里render方法可将JSX片段进行删除。另外因为React每次执行setState都会触发render方法,而render方法内会接受到最新的state数据来更新视图,因此这里产生的最新state正是需要提供给小程序的setData方法,从而触发小程序的数据渲染,为此将render名称重命名为createData(生产小程序的data数据),同时改写内部逻辑,将产生的最新state进行返回。
使用运行时垫片提供的createPage方法进行初始化(createPage方法实现具体逻辑后文会贴出),同时通过小程序平台提供的Page方法进行注册,从这里可得知createPage方法返回的数据肯定是一个object类型。
运行时垫片(app.js)实现逻辑如下:
1 2 3 4 5 6 7 8 9 10 11 12 13 14 15 16 17 18 19 20 21 22 23 24 25 26 27 28 29 30 31 32 33 34 35 36 37 38 39 40 41 42 43 44 45 | export class Component {
constructor() {
this.state = {}
}
setState(state) {
update(this.$scope.$component, state)
}
_init(scope) {
this.$scope = scope
}
}
function update($component, state = {}) {
$component.state = Object.assign($component.state, state)
let data = $component.createData(state)
data['$leoCompReady'] = true
$component.state = data
$component.$scope.setData(data)
}
export function createPage(ComponentClass) {
const componentInstance = new ComponentClass()
const initData = componentInstance.state
const option = {
data: initData,
onLoad() {
this.$component = new ComponentClass()
this.$component._init(this)
update(this.$component, this.$component.state)
},
onReady() {
if (typeof this.$component.componentDidMount === 'function') {
this.$component.componentDidMount()
}
}
}
const events = ComponentClass['$$events'] // 获取React组件内所有事件回调方法名称
if (events) {
events.forEach(eventHandlerName => {
if (option[eventHandlerName]) return
option[eventHandlerName] = function () {
this.$component[eventHandlerName].call(this.$component)
}
})
}
return option
}
|
上文提到了重写Component类和createPage方法具体实现逻辑如上代码所示。
Component内声明的state会执行一个update方法,update方法里主要是将 React 产生的新state和旧state进行合并,然后通过上文说的createData方法获取到合并后的最新state,最新的state再传递给小程序进行setData,从而实现小程序数据渲染。
createPage方法逻辑首先是将 React 组件实例化,然后构建出一个小程序逻辑的对应字面量,并将 React 组件实例相关方法和这个小程序逻辑对象字面量进行绑定:其次进行生命周期绑定:在小程序onReady周期里出发 React 组件对应的componentDidMount生命周期;最好进行事件绑定:通过上文提到的回调事件名,取出React 组件实例内的对应的事件,并将这些事件注册到小程序逻辑的对应字面量内,这样就完成小程序平台事件绑定。最后将这个对象字面量返回,供前文所说的Page方法进行注册。
到此,就可以实现 React 代码运行到小程序平台了,可以在项目源码里执行 npm run build:compile 看看效果。编译时实现方案主要是通过静态编译JSX代码和运行时垫片结合,完成 React 代码运行到小程序平台,这种方案基本无性能上的损耗,且可以在运行时垫片做一些优化处理(比如去除不必要的渲染数据,减少setData数据量),因此其性能与使用小程序原生语法开发相近甚至某些场景会更优。然而这种方案的缺点就是语法限制问题(上文已经提过了),使得开发并不友好,因此也就有了运行时实现方案的诞生。
运行时实现
从上文可以看出,编译时实现之所以有语法限制,主要因为其不是让 React 真正运行到小程序平台,而运行时实现方案则可以,其原理是在小程序平台实现一个 React 自定义渲染器,用来渲染 React 代码。这里我们以 remax 框架实现方式来进行讲解,本项目源码中的运行时实现也正是参照 remax 框架实现的。
如果使用过 React 开发过 Web,入口文件有一段类似这样的代码:
1 2 3 4 5 6 7 8 | import React from 'react'
import ReactDom from 'react-dom'
import App from './App'
ReactDom.render(
App,
document.getElementById('root')
)
|
可以看出渲染 Web 页面需要引用一个叫 react-dom 模块,那这个模块作用是什么?react-dom是 Web 平台的渲染器,主要负责将 React 执行后的Vitrual DOM数据渲染到 Web 平台。同样的,React 要渲染到 Native,也有一个针对 Native 平台的渲染器:React Native。
React实现多平台方式,是在每个平台实现一个React渲染器,如下图所示。
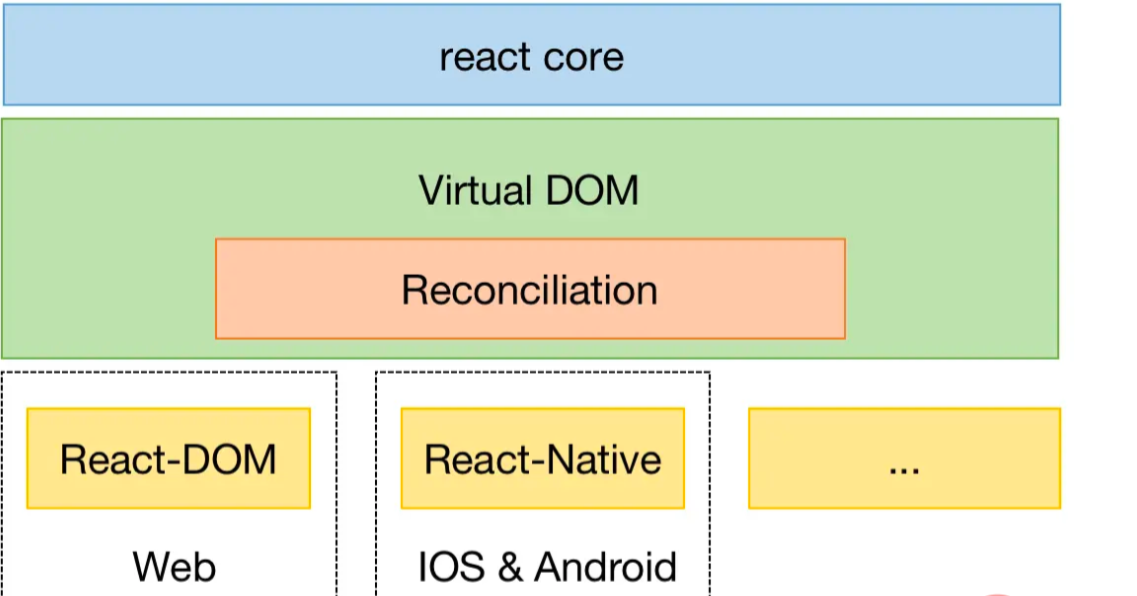
而如果要将 React 运行到小程序平台,只需要开发一个小程序自定义渲染器即可。React 官方提供了一个react-reconciler 包专门来实现自定义渲染器,官方提供了一个简单demo重写了react-dom。
使用react-reconciler实现渲染器主要有两步,第一步:实现渲染函数(render方法),类似ReactDOM.render方法:
1 2 3 4 5 6 7 8 9 10 11 12 13 14 15 16 17 18 19 | import ReactReconciler from 'react-reconciler'
import hostConfig from './hostConfig' // 宿主配置
const ReactReconcilerInst = ReactReconciler(hostConfig)
export function render(element, container, callback) {
if (!container._rootContainer) {
container._rootContainer = ReactReconcilerInst.createContainer(container, false);
}
return ReactReconcilerInst.updateContainer(element, container._rootContainer, null, callback);
}
|
第二步,如上图引用的import hostConfig from './hostConfig' ,需要通过react-reconciler实现宿主配置(HostConfig),HostConfig是宿主环境提供一系列适配器方案和配置项,定义了如何创建节点实例、构建节点树、提交和更新等操作,完整列表可以点击查看。值得注意的是在小程序平台未提供DOM API操作,只能通过setData将数据传递给视图层。因此Remax重新定义了一个VNode类型的节点,让 React 在reconciliation过程中不是直接去改变DOM,而先更新VNode,hostConfig文件内容大致如下:
1 2 3 4 5 6 7 8 9 10 11 12 13 14 15 16 17 18 19 20 21 22 23 24 25 26 27 28 29 30 31 32 33 34 35 36 37 38 39 40 41 42 43 44 | interface VNode {
id: number;
container: Container;
children: VNode[];
type: string | symbol;
props?: any;
parent: VNode | null;
text?: string;
appendChild(node: VNode): void;
removeChild(node: VNode): void;
insertBefore(newNode: VNode, referenceNode: VNode): void;
...
}
const hostConfig = {
...
resetAfterCommit: (container) => {
container.applyUpdate();
},
createInstance(type, newProps, container) {
const id = generate();
const node = new VNode({ ... });
return node;
},
appendChild(parent, child) {
parent.appendChild(child);
},
insertBefore(parent, child, beforeChild) {
parent.insertBefore(child, beforeChild);
},
removeChild(parent, child) {
parent.removeChild(child);
}
...
};
|
除了上面的配置内容,还需要提供一个容器用来将VNode数据格式化为JSON数据,供小程序setData传递给视图层,这个容器类实现如下:
1 2 3 4 5 6 7 8 9 10 11 12 13 14 15 16 17 18 19 20 21 22 23 24 25 26 27 28 29 | class Container {
constructor(context) {
this.root = new VNode({..});
}
toJson(nodes ,data) {
const json = data || []
nodes.forEach(node => {
const nodeData = {
type: node.type,
props: node.props || {},
text: node.text,
id: node.id,
children: []
}
if (node.children) {
this.toJson(node.children, nodeData.children)
}
json.push(nodeData)
})
return json
}
applyUpdate() {
const root = this.toJson([this.root])[0]
console.log(root)
this.context.setData({ root});
}
...
}
|
紧接着,我们封装一个createPageConfig方法,用来执行渲染,其中Page参数为 React 组件,即上文计数器的组件。
1 2 3 4 5 6 7 8 9 10 11 12 13 14 15 16 17 18 19 20 21 22 23 | import * as React from 'react';
import Container from './container'; // 上文定义的Container
import render from './render'; // 上文定义的render方法
export default function createPageConfig(component) {
const config = {
data: {
root: {
children: [],
}
},
onLoad() {
this.container = new Container(this, 'root');
const pageElement = React.createElement(component, {
page: this,
});
this.element = render(pageElement, this.container);
}
};
return config;
}
|
到这里,基本已经实现完小程序渲染器了,为了使代码跑起来,还需要通过静态编译改造下 React 计数器组件,其实就是在末尾插入一句代码:
1 2 3 4 5 6 7 8 9 10 11 12 13 14 15 | import React, { Component } from 'react';
export default class Index extends Component {
constructor() {
super();
this.state = {
count: 0
};
this.onAddClick = this.onAddClick.bind(this);
this.onReduceClick = this.onReduceClick.bind(this);
}
...
}
Page(require('../../npm/app.js').createPage(Index))
|
通过这样,就可以使得React代码在小程序真正运行起来了,但是这里我们还有个流程没介绍,上述Container类的applyUpdate方法中生成的页面JSON数据要如何更新到视图?首先我们先来看下这个JSON数据长什么样子:
1 2 3 4 5 6 7 8 9 10 11 12 13 14 15 16 17 18 19 20 21 22 23 24 25 26 27 28 29 30 31 32 33 34 35 36 37 38 39 40 41 | {
"type": "root",
"props": {},
"id": 0,
"children": [{
"type": "view",
"props": {
"class": "container"
},
"id": 12,
"children": [{
"type": "view",
"props": {
"class": "conut"
},
"id": 4,
"children": [{
"type": "text",
"props": {},
"id": 3,
"children": [{
"type": "plain-text",
"props": {},
"text": "count: ",
"id": 1,
"children": []
}, {
"type": "plain-text",
"props": {},
"text": "1",
"id": 2,
"children": []
}]
}]
}
...
...
}]
}
|
可以看出JSON数据,其实是一棵类似Tree UI的数据,要将这些数据渲染出页面,可以使用小程序提供的Temlate进行渲染,由于小程序模板递归嵌套会有问题(微信小程序平台限制),因此需要提供多个同样组件类型的模板进行递归渲染,代码如下:
1 2 3 4 5 6 7 8 9 10 11 12 13 14 15 16 17 18 19 20 21 22 23 24 25 26 27 28 29 30 31 32 33 34 35 36 37 38 39 40 41 42 43 44 45 46 47 48 | <template is="TPL" data="{{root: root}}" />
<template name="TPL">
<block wx:for="{{root.children}}" wx:key="id">
<template is="TPL_1_CONTAINER" data="{{i: item, a: ''}}" />
</block>
</template>
<template name="TPL_1_view">
<view
style="{{i.props.style}}"
class="{{i.props.class}}"
bindtap="{{i.props.bindtap}}"
>
<block wx:for="{{i.children}}" wx:key="id">
<template is="{{'TPL_' + (tid + 1) + '_CONTAINER'}}" data="{{i: item, a: a, tid: tid + 1 }}" />
</block>
</view>
</template>
<template name="TPL_2_view">
<view
style="{{i.props.style}}"
class="{{i.props.class}}"
bindtap="{{i.props.bindtap}}"
>
<block wx:for="{{i.children}}" wx:key="id">
<template is="{{'TPL_' + (tid + 1) + '_CONTAINER'}}" data="{{i: item, a: a, tid: tid + 1 }}" />
</block>
</view>
</template>
<template name="TPL_3_view">
<view
style="{{i.props.style}}"
class="{{i.props.class}}"
bindtap="{{i.props.bindtap}}"
>
<block wx:for="{{i.children}}" wx:key="id">
<template is="{{'TPL_' + (tid + 1) + '_CONTAINER'}}" data="{{i: item, a: a, tid: tid + 1 }}" />
</block>
</view>
</template>
...
...
|
至此,就可以真正实现 React 代码运行到小程序了,可以在项目源码里执行npm run build:runtime看看效果。运行时方案优点是无语法限制,(不信的话,可以在本项目里随便写各种动态写法试试哦),而缺点时性能比较差,主要原因是因为其setData数据量比较大(上文已经贴出的JSON数据,妥妥的比编译时方案大),因此性能就比编译时方案差。当然了,业界针对运行时方案也有做大量的性能优化,比如局部更新、虚拟列表等,由于篇幅问题,这里就不一一讲解(代码中也没有实现)。
总结
本文以最简实现方式讲述了 React 构建小程序两种实现方案,这两种方案优缺点分明,都有各自的优势,对于追求性能好场的场景,编译时方案更为合适。对于着重开发体验且对性能要求不高的场景,运行时方案为首选。如果想了解更多源码实现,可以去看下 Taro、Remax 官方源码,欢迎互相讨论。
版权声明:本文内容由网络用户投稿,版权归原作者所有,本站不拥有其著作权,亦不承担相应法律责任。如果您发现本站中有涉嫌抄袭或描述失实的内容,请联系我们jiasou666@gmail.com 处理,核实后本网站将在24小时内删除侵权内容。


暂时没有评论,来抢沙发吧~