
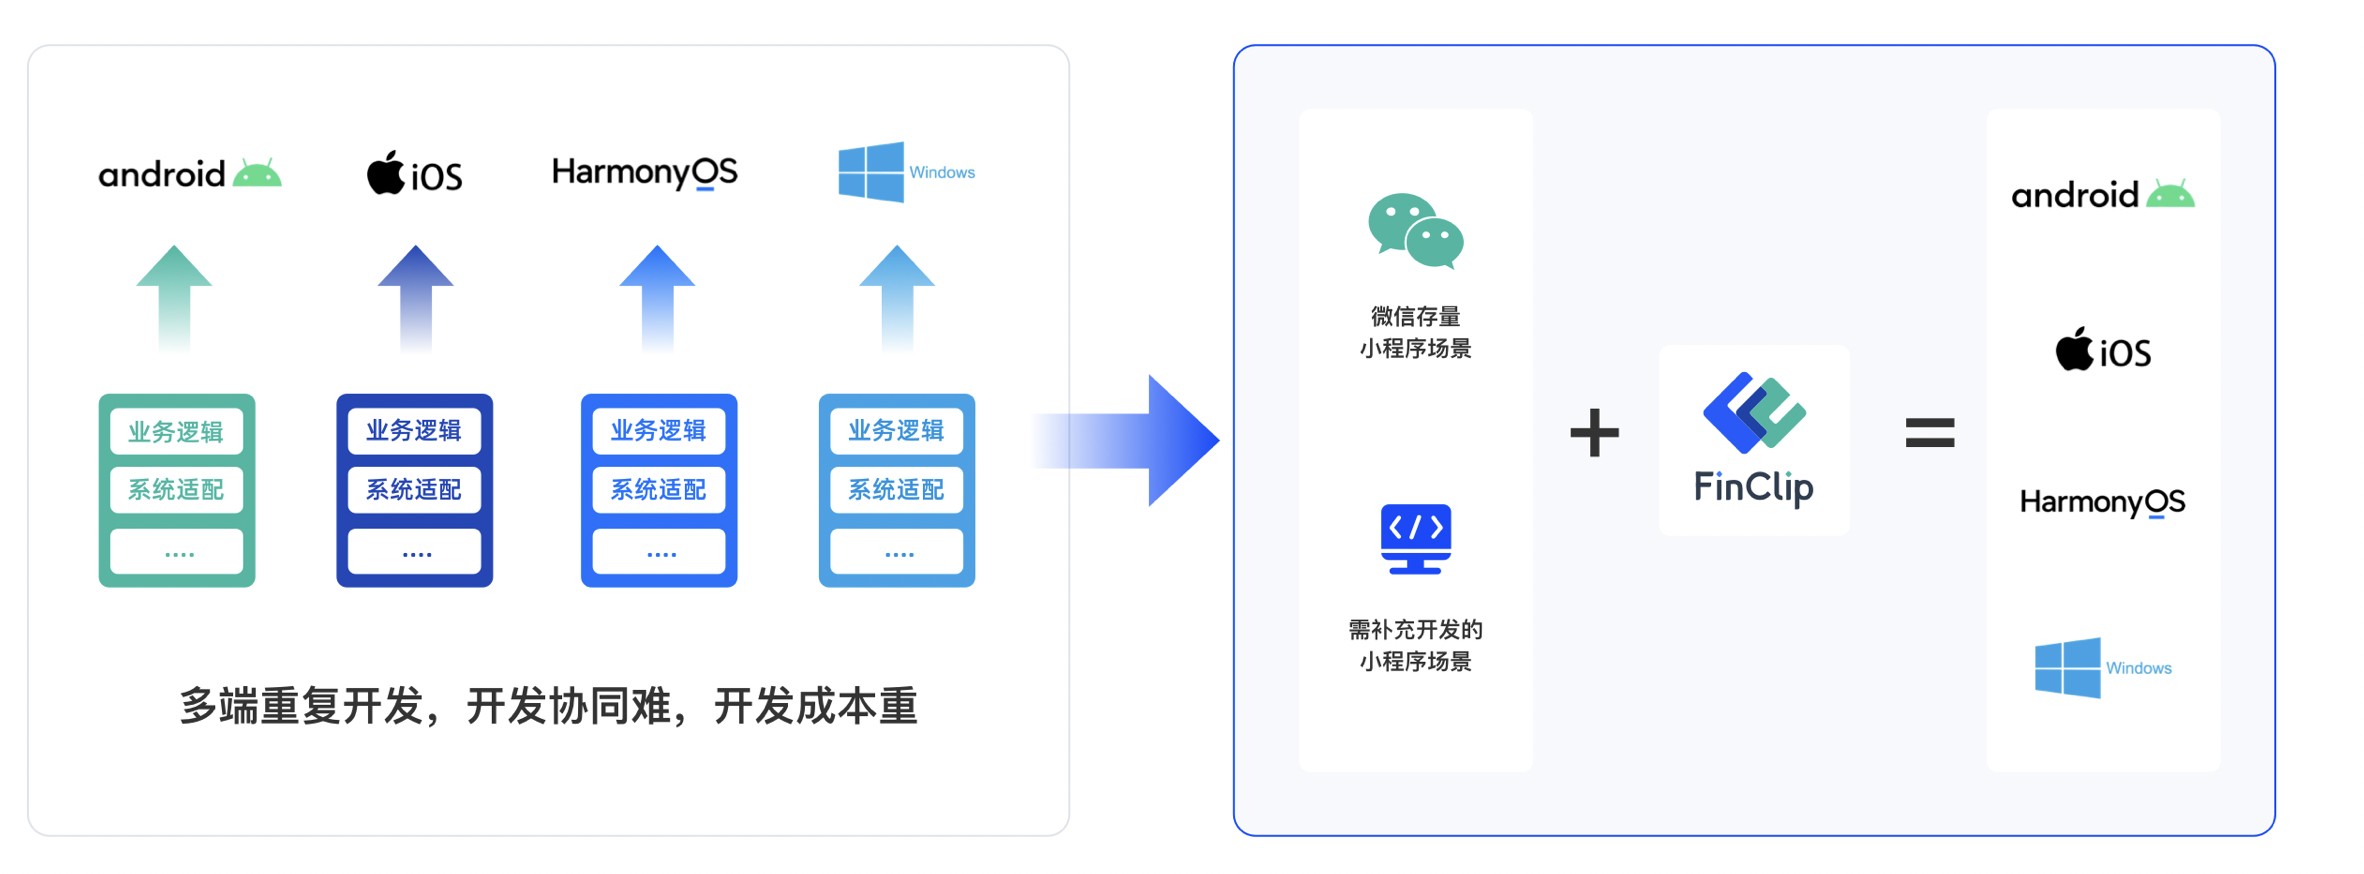
前端框架选型是企业提升开发效率与用户体验的关键因素
267
2023-11-29

这篇文章将为大家详细讲解有关如何部署goldengate,小编觉得挺实用的,因此分享给大家做个参考,希望大家阅读完这篇文章后可以有所收获。

一、安装redhat4,安装步骤略
二、安装oracle10g 安装步骤略
三、安装goldengate,注意要选对版本
1、源端安装配置
1.1安装goldengate
linux: mkdir /u01/oracle/ggate
cd /u01/oracle/ggate通过ftp,将goldengate的zip软件上传到/u01/oracle/ggate
unzip 解压,将生成一个tar文件
tar -xvf *.tar
1.2配置.bash_profile
vi .bash_profile
添加:
export LD_LIBRARY_PATH=$ORACLE_HOME/lib:/u01/oracle/ggate
export GGATE_HOME=/u01/oracle/ggate注意LD_LIBRARY_PATH,那一行,可以在原来安装oracle的基础上添加在后面便可
配置完,运行 source ~./bash_profile
1.3创建goldengate目录
cd /u01/oracle/ggate
./ggsci (进入goldengate命令行界面)
Oracle GoldenGate Command Interpreter for Oracle
Version 11.1.1.0.0 Build 078
Linux, x86, 32bit (optimized), Oracle 10 on Jul 28 2010 13:24:18
Copyright (C) 1995, 2010, Oracle and/or its affiliates. All rights reserved现在在goldengate命令行工作
create subdirs1.4配置数据库归档模式,进入sql命令行(如果关闭,建议开启)
sqlplus "/as sysdba"
alter system set log_archive_format=%s_%t_%r.log scope=spfile;
alter system set log_archive_dest_1=location=/u02/oracle/arc;shutdown immediate;
startup mount;
alter database archivelog;
alter database open;
alter database force logging;
----取消用 alter database no force logging;
这下可以看一下归档是否已经起来,archive log list
1.5开启minimal supplemental logging
alter database add supplemental log data(primary key,unique) columns;
1.6关闭回收站
alter system set recyclebin=off scope=spfile;
1.7配置复制的DDL支持
创建用户授权:
create user ggate identified by ggate default tablespace users temporary tablespace temp quota unlimited on users;
grant connect,resource,dba to ggate;
grant execute on utl_file to ggate;
grant restricted session to ggate;
@$GGATE_HOME/marker_setup.sql;SCHEMA:GGATE
@$GGATE_HOME/ddl_setup.sql;
这里要看清楚,选择输入,否则会有问题!
@$GGATE_HOME/role_setup.sql;
授予角色权力:
grant GGS_GGSUSER_ROLE to ggate;@$GGATE_HOME/ddl_enable.sql;
1.8创建源端用户(用于同步的用户)
create user sender identified by ggate default tablespace users temporary tablespace temp quota unlimited on users;
grant dba,connect,resource to ggate;
grant select on v_$session to ggate;
2、源端复制队列配置
2.1配置manager
cd /u01/oracle/ggate
./ggsci (进入goldengate命令行)
edit params mgr
输入:PORT 7809
与vi操作基本相同
2.2配置源端复制队列
同样是在goldengate命令行里做add extract ext1, tranlog, begin now
add exttrail /u01/oracle/ggate/dirdat/lt, extract ext1
edit params ext1
输入如下内容:
extract ext1
userid ggate, password ggate
rmthost 目标机, mgrport 7809
rmttrail /u01/oracle/ggate/dirdat/lt
ddl include mapped objname sender.*;
table sender.*;到这里,可以用info all查看一下,
关闭进程:
stop mgr
stop ext1到这里源端基本上配置完毕
3、目标端安装配置
3.1安装goldengate
linux: mkdir /u01/oracle/ggate
cd /u01/oracle/ggate通过ftp,将goldengate的zip软件上传到/u01/oracle/ggate
unzip 解压,将生成一个tar文件
tar -xvf *.tar
3.2配置.bash_profile
vi .bash_profile
添加:
export LD_LIBRARY_PATH=$ORACLE_HOME/lib:/u01/oracle/ggate
export GGATE_HOME=/u01/oracle/ggate注意LD_LIBRARY_PATH,那一行,可以在原来安装oracle的基础上添加在后面便可
配置完,运行 source ~./bash_profile
3.3创建goldengate目录
cd /u01/oracle/ggate
./ggsci (进入goldengate命令行界面)
Oracle GoldenGate Command Interpreter for Oracle
Version 11.1.1.0.0 Build 078
Linux, x86, 32bit (optimized), Oracle 10 on Jul 28 2010 13:24:18
Copyright (C) 1995, 2010, Oracle and/or its affiliates. All rights reserved现在在goldengate命令行工作
create subdirs3.4创建目标端用户
create user ggate identified by ggate default tablespace users temporary tablespace temp quota unlimited on users;
create user receiver identified by ggate default tablespace users temporary tablespace temp quota unlimited on users;(接收同步的用户)
grant connect,resource,dba to ggate;
grant execute on utl_file to ggate;
grant restricted session to ggate;
grant connect,resource,dba to receiver;
grant select on v_$session to receiver;
3.5配置replicat
./ggsci
edit params ./GLOBALS
输入:
GGSCHEMA ggate
CHECKPOINTTABLE ggate.checkpoint
edit params mgr输入:PORT 7809
在goldengate命令行登录数据库dblogin userid ggate,password ggate
add checkpointtable ggate.checkpoint (增加检测点)
add replicat rep1, exttrail /u01/oracle/ggate/dirdat/lt, checkpointtable ggate.checkpoint(增加同不队列)
edit params rep1
添加如下内容:
replicat rep1
ASSUMETARGETDEFS
userid ggate, password ggate
discardfile /u01/oracle/ggate/dirdat/rep1_discard.txt, append, megabytes 10
DDL include all
map sender.*, target receiver.*;到这里上标端配置基本结束
四、额外增加的一个步骤,我是这样做
分别在源端、目标端增加
mkdir -p /u01/oracle/ggate/dirdat/lt五、在goldengate命令行开启
源端:start manager
start ext1目标:start manager
start rep1六、测试:
源端:create table sender.test(empid number(4),names varchar2(10),oldage number(3));
目标:select * from receiver.test;关于“如何部署goldengate”这篇文章就分享到这里了,希望以上内容可以对大家有一定的帮助,使各位可以学到更多知识,如果觉得文章不错,请把它分享出去让更多的人看到。
版权声明:本文内容由网络用户投稿,版权归原作者所有,本站不拥有其著作权,亦不承担相应法律责任。如果您发现本站中有涉嫌抄袭或描述失实的内容,请联系我们jiasou666@gmail.com 处理,核实后本网站将在24小时内删除侵权内容。

发表评论

暂时没有评论,来抢沙发吧~