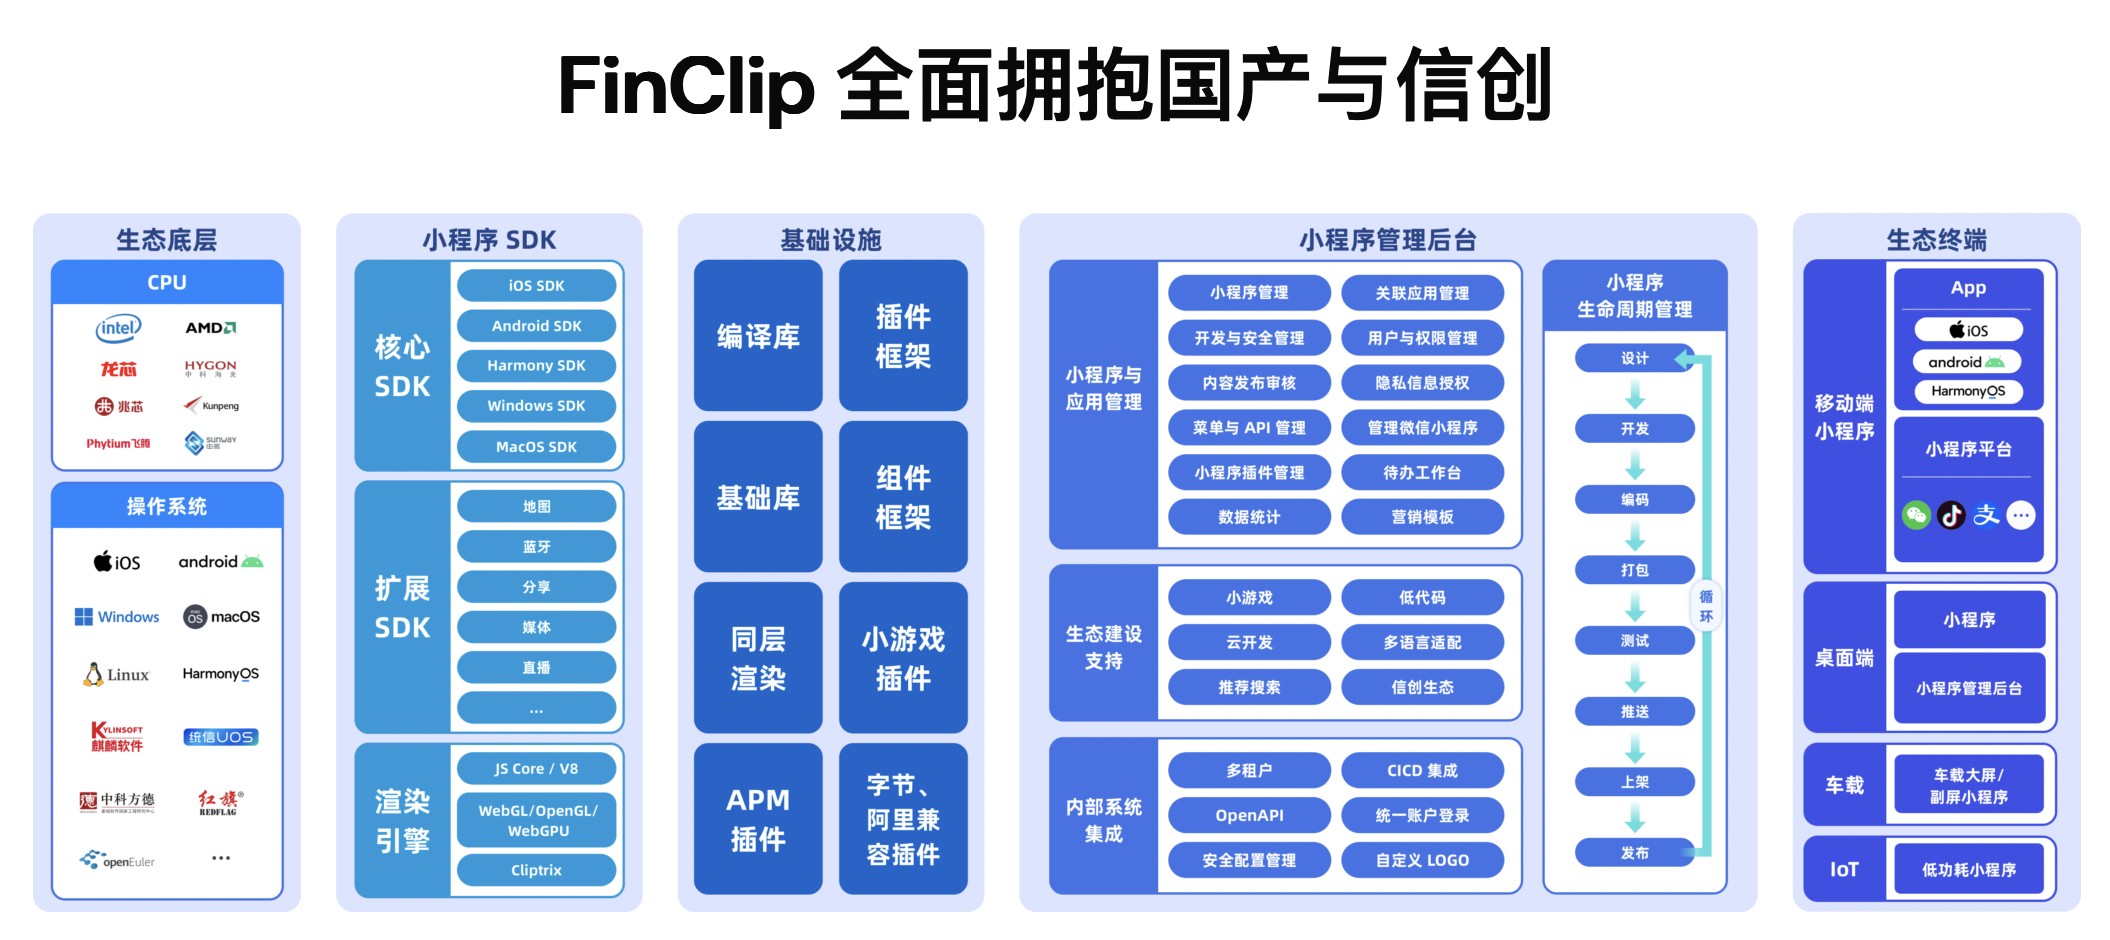
洞察探讨小游戏SDK接入的最佳实践以及对企业跨平台开发的优势
682
2022-12-18

教你使用IDEA搭建spring源码阅读环境的详细步骤

目录第一步、准备gradle环境第二步、下http://载EjsBBGyppSspring源码
第一步、准备gradle环境
1、去官网-gradle
https://gradle.org/releases/
2、将其解压缩,创建repository文件夹 和init.d文件夹
创建init.gradle文件
输入文本信息,主要是配置阿里云镜像仓库地址,和maven的类似
gradle.projectsLoaded {
rootProject.allprojects {
buildscript {
repositories {
def JCENTER_URL = 'https://maven.aliyun.com/repository/jcenter'
def GOOGLE_URL = 'https://maven.aliyun.com/repository/google'
def NEXUS_URL = 'http://maven.aliyun.com/nexus/content/repositories/jcenter'
all { ArtifactRepository repo ->
if (repo instanceof MavenArtifactRepository) {
def url = repo.url.toString()
if (url.startsWith('https://jcenter.bintray.com/')) {
project.logger.lifecycle "Repository ${repo.url} replaced by $JCENTER_URL."
println("buildscript ${repo.url} replaced by $JCENTER_URL.")
remove repo
}
else if (url.startsWith('https://dl.google.com/dl/android/maven2/')) {
project.logger.lifecycle "Repository ${repo.url} replaced by $GOOGLE_URL."
println("buildscript ${repo.url} replaced by $GOOGLE_URL.")
remove repo
}
else if (url.startsWith('https://repo1.maven.org/maven2')) {
project.logger.lifecycle "Repository ${repo.url} replaced by $REPOSITORY_URL."
println("buildscript ${repo.url} replaced by $REPOSITORY_URL.")
remove repo
}
}
}
jcenter {
url JCENTER_URL
}
google {
url GOOGLE_URL
}
maven {
url NEXUS_URL
}
}
}
}
3、为了方便,设置环境变量GRADLE_HOME 和GRADLE_USER_HOME(看后面的截图就明白会被idea使用)
GRADLE_HOME
gradle路径,例如:
D:\Program Files\gradle-6.8.3
第二步、-spring源码
github-源码比较慢,我们通过码云的方式将其-下来。当然也可以直接从github的官网直接拉取下拉。
spring源码官网:https://github.com/spring-projects/spring-framework
以下是同步到码云的操作
确认后就可以同步完成了
由于从码云上拉取代码需要ssh校验
如果之前有弄过ssh-keygen -t rsa也就是在个人文件夹下有一个.ssh文件夹里面有一个公钥
如下,讲id_rsa.pub已文本打开,复制里面的内容。
然后我们就可以通过IDEA的get from version control
复制ssh的连EJsBBGyppS接,然后粘贴到idea中,与github上的git操作一致
刷新以下gradle依赖,首次刷新会非常慢,如果遇到了错误提示,则根据错误提示进行处理。完成后就会像我这样。
完成上面操作后spring的源码环境就算完成了。
版权声明:本文内容由网络用户投稿,版权归原作者所有,本站不拥有其著作权,亦不承担相应法律责任。如果您发现本站中有涉嫌抄袭或描述失实的内容,请联系我们jiasou666@gmail.com 处理,核实后本网站将在24小时内删除侵权内容。


发表评论

暂时没有评论,来抢沙发吧~